Printfriendly

Print Friendly and PDF
Showing posts with label bread. Show all posts

Tuesday, January 1, 2013

Rosca de Reyes - Mexican Kings Cake

Hello everybody! Well... it's almost time for our next celebration, at least in Mexico, we celebrate "Dia de Reyes" (Three Kings Day) ... If you want to know more about this tradition, well go to my post about it just click here... I'll just quote a little something from that post here...

- "In many cities in Mexico "Santa" is not the one who brings the presents but "The Three Kings". Early on January 6th morning many children received their toys! And as they play and enjoy what their gifts the adults get ready to have a "merienda" (an early evening dinner) where they will have the "ROSCA DE REYES" (Three Kings Cake) and hot chocolate or coffee!" -

So... this year I will be making my own... and I actually JUST made one to share the recipe and pictures with all of you... There are many versions of this bread... but this is one of the easiest you'll find and also way more delicious than store bought! I hope you enjoy it!


Rosca de Reyes


For the bread:
  • 2 tsp. active dry yeast
  • 1/4 cup warm milk
  • 3 1/2 cups all purpose flour
  • 1/2 tsp. salt
  • 1/2 cup unsalted butter (room temperature)
  • 4 eggs
  • 10 tablespoons of granulated sugar
  • the zest of 1 orange
  • 1 tsp. vanilla

For the "crumb/sugar topping"
  • 1 egg yolk
  • 1 pinch of salt
  • 3/4 cup confectioners sugar
  • 3/4 cup flour
  • 1 stick of softened butter
  • 1 tsp. vanilla

Additional toppings:
  • 1 egg for "varnishing"
  • Candied cherries and assorted candied fruits, like lemon/orange/lime candied peel and/or fruit cake mix
  • Colored sugar (yellow/green/red are traditional colors)
  • Granulated sugar to sprinkle


Directions:
Mix (with a plastic spoon and in a clean glass or plastic container) the dry yeast, warm milk and one tablespoon of sugar. Cover and let it rest in a warm dark place (it could be inside your oven) for 10 minutes
In a a mixing bowl add 1 cup of flour and the "yeast mixture" using the hook attachment mix for 1 minute, slowly add another cup of flour, salt,  butter, eggs, sugar and continue mixing, incorporate remaining flour and add orange zest/vanilla and mix for about 4 minutes.

Transfer your dough to a floured surface and knead with your hands adding more flour until your dough is no longer sticky. Return dough to mixing bowl, cover with a damp cloth and let it rest for 2 hours inside your oven (it's better if it's a little warm but not hot), the secret with this bread is to be patient, you just have to "forget about your dough" for those 2 hours and not be uncovering it, it needs to rest like that to be able to rise and let the yeast do the work.

After the dough has doubled in size, kind of "punch it" with your knuckles (again on a slightly floured surface) to get the air out of the dough (punch it about 4 times only) then roll it out to form an oval and it should be about 1/2 inch thick.

I couldn't take pictures at this point but this is how you should roll your dough.

Then starting from the further side from you start rolling your dough (not too tight but not loose either) towards you to form like a "taco"

(As you are rolling this would be the time to insert a couple of little plastic dolls that the traditional bread calls for, I left those out)

Then grab your "roll", transfer to a slightly greased jelly roll pan and shape it into an oval, handling the dough to join the ends as much as you can with your fingers and then just kind of press the oval shaped roll down to flatten a little.


Cover with a damp cloth and transfer your oval shaped roll back to a warm/dark place and let it rest for another hour.

When the hour has passed now just "varnish" your dough using 1 slightly beaten egg and a pastry brush


It's time to make the crumb topping:

Just incorporate all the crumb topping ingredients (egg yolk, powdered sugar, salt, flour and vanilla) and don't over mix, roll it out and cut "stripes" that you will place on top of your "rosca" as you wish, it's a delicious topping, next time I will use more of it... but here's what I did:


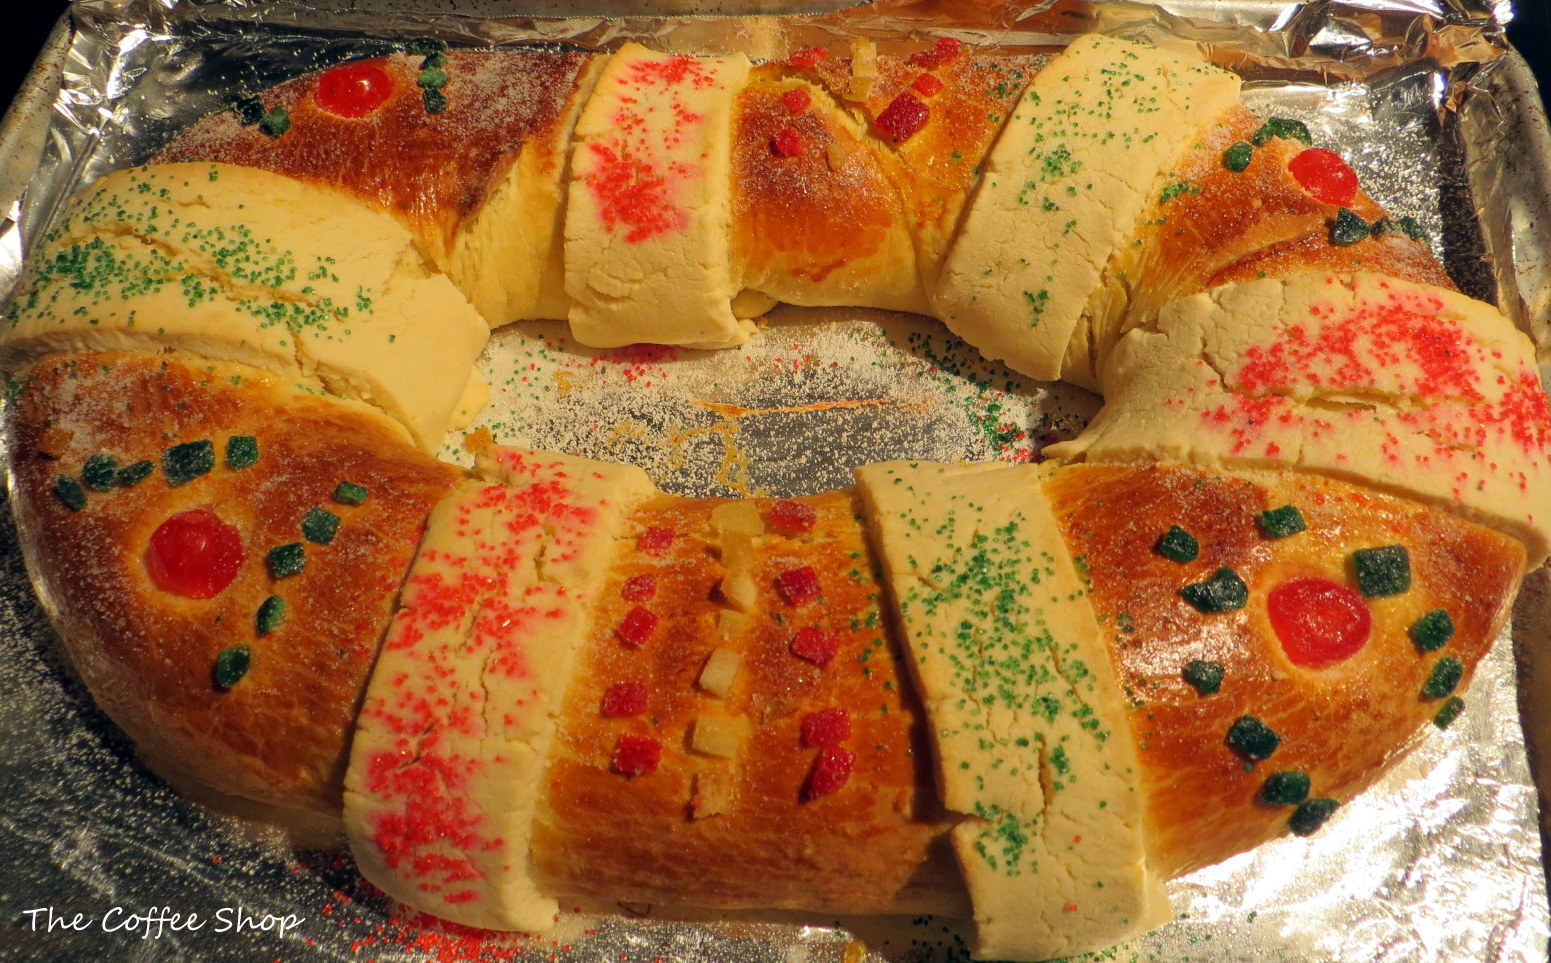
Now just decorate with the fruit and the colored sugars and then sprinkle additional granulated sugar all over it!


Bake in preheated oven at 350F until a beautiful dark golden color shows (for about 20 up to 30 minutes, time might vary depending on the oven)

ENJOY!

© Paloma K.

Thursday, May 31, 2012

Old friends and Lighter Chicken and Biscuits

Hello everybody! I am sooo happy! It's almost Friday! If you know me then you know I am not someone who complains about Mondays and is only happy when it's Friday...  I actually love Mondays! It feels to me like they are always a good opportunity to do things differently, etc... but... this time I am super excited because tomorrow we'll have friends -who live far away- coming over! ... they've been my friends for so long! They are a couple (Tere and Daniel) ... I've known her since I was 12 and I know him since I was I think 15 or 16 ... it turns out that they have always been like a sister and a brother to me and then they got married! How cool is that? To have your best friends get married and you can keep talking and hanging out and just sharing the same memories, etc... I actually went with him to the jewelry when he was looking for an engagement ring for her about 16 years ago! WOW! then we continued to hang out in church and later on at work, Daniel and I worked at the same company together and when I lived the hardest times in my life they both were there for me, just like family!... and I think I am going to be grateful with them FOREVER! They now have 3 kids and I am sure you can imagine how THRILLED I am to think of our children playing together! Oh! Memories... sweet memories! So... they'll be spending the weekend with us!

.... and now... the recipe:

As good as sweet memories "  Lighter Chicken and Biscuits"
(Slightly adapted from Martha Stewart's recipes)


Inspired by southern comfort food. It's not exactly "low calorie" but it is still a healthier version.

Today is SIMPLE LIVES THURSDAY ... if you want to know more about it visit Diana's blog:  "A Little Bit of Spain in Iowa" go visit her and join her on this project! It is very cool! It's all about tips/recipes, etc... on living a "Simple (and wholesome) life" ... I hope you like it.

Serves 4

Ingredients

  • 1/3 cup whole-wheat flour, spooned and leveled
  • 1/3 cup plus 2 tablespoons all-purpose flour, spooned and leveled
  • 1 teaspoon baking powder
  • Coarse salt and ground pepper
  • 1 large egg white
  • 3 tablespoons plus 2 teaspoons vegetable oil, such as safflower
  • 1 cup low-fat (1 percent) milk -You can use whole milk if you prefer-
  • 5 carrots, thinly sliced
  • 5 celery stalks, thinly sliced
  • 1 box (10 ounces) frozen pearl onions, thawed
  • 1/4 teaspoon dried thyme
  • 2 pounds boneless, skinless chicken breasts, cut into 1-inch pieces

Directions

  1. Preheat oven to 450 degrees. In a medium bowl, whisk together whole-wheat flour, 1/3 cup all-purpose flour, baking powder, and 1/4 teaspoon salt; set aside.
  2. In a small bowl, whisk together egg white, 3 tablespoons oil, and 1/4 cup milk; add to flour mixture, and stir until moistened. Drop four 1/4-cup scoops of dough onto a baking sheet, at least 2 inches apart. Bake until golden, 12 to 14 minutes.
  3. Meanwhile, in a 5-quart Dutch oven or large heavy pot, heat remaining 2 teaspoons oil over medium-high. Add carrots, celery, and onions; season with salt and pepper. Cook, stirring frequently, until vegetables are tender, 7 to 10 minutes.
  4. Sprinkle vegetables with remaining 2 tablespoons all-purpose flour; stir in remaining 3/4 cup milk, 1/2 cup water, and thyme. Simmer until liquid is thickened, 2 to 3 minutes, stirring occasionally, (add more liquid if too thick). Add chicken; simmer until cooked through, 3 to 5 minutes. Serve chicken stew with biscuits.

So... to good friends! ... ENJOY!

 © Paloma K

Wednesday, December 30, 2009

FLOUR TORTILLAS - My first attempt

My dad is a professional baker, that's what he does best (besides making me laugh and being the greatest dad ever), anyway.... I think he was probably born making bread! His specialty is a traditional bread from the north of Mexico, his grandmother (dad's side) was left a widow in her twenties and she had several kids to raise, she was a very hardworking woman and decided to start baking "semitas" (which means "semites" in English), it's a type of "Arabic" bread but a little "Mexicanized", some of the ingredients for this type of bread are: piloncillo (which is basically a solid piece of sucrose and fructose obtained from the boiling and evaporation of sugarcane juice), pecans and raisins! And she would bake it in a mud oven... It is the best bread ever! She taught her children how to bake it so my dad's father started his own bakery (which became very big and famous) and he also taught his children how to make it... That is how my father started and continued to bake! His skillful hands have "memory" as they always remember the exact amount of flour, sugar, butter or any ingredient. I was never really interested in learning how to bake, I always thought it was so boring! I mean... why bake if you can buy things already made? (DUH! yes, please forgive me, I was younger and stupid!) Now, it's different, I came to live in the USA because I married a wonderful Godly man who lives here, I love him so much that I left everything behind, I still have daily communication with my family in Mexico but I miss them so much! And I started to think I should've learned how to bake! My dad's given me many of his recipes... but this bread is so special that it requires him to teach me in person! (or at least that is what I want!), I think I will actually start blogging about my project to make all the types of bread my dad makes! Yes I will... so wait for it!!

My dad also makes the best flour tortillas (nothing like those flour tortillas I've found here in the USA!) so I decided I would try to make them... and I did, it wasn't as easy as I thought it would be... I was actually embarrassed because my dad makes perfect circles every single time, and mine looked more like "maps" if anything! The flavor was still delicious and my husband loved them! You can even just put some butter on them while they are hot and have a cup of coffee (YES... coffee is the best thing to have!!!) they melt in your mouth! So... I am glad to present to you My first FLOUR TORTILLAS!