Showing posts with label holidays. Show all posts
Sunday, January 6, 2013
Tuesday, January 1, 2013
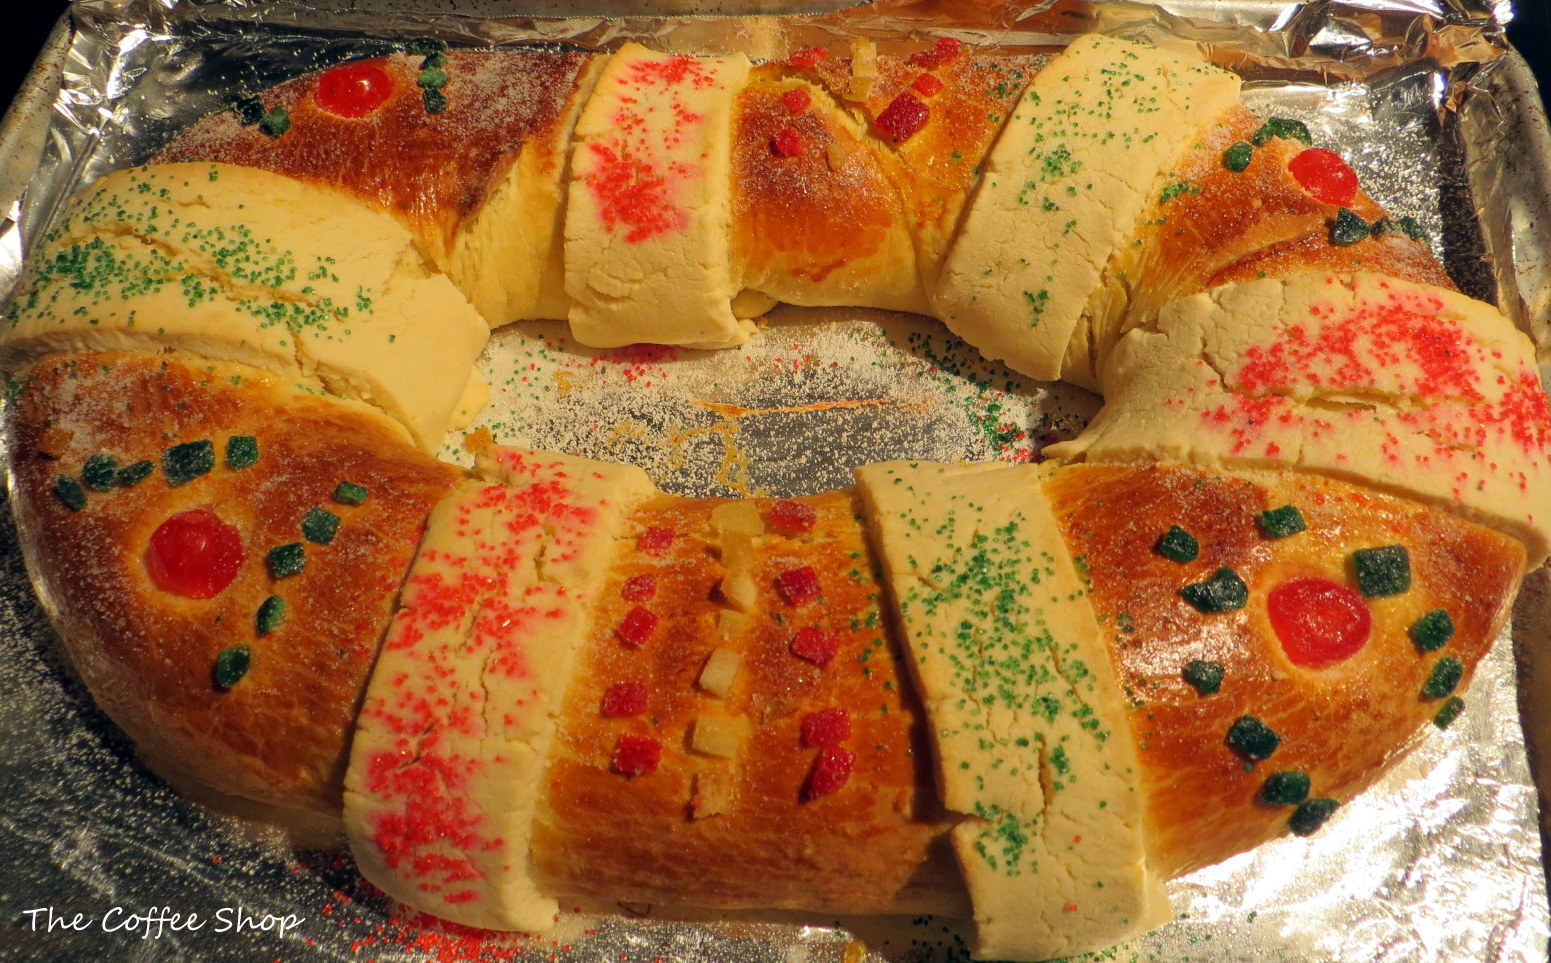
Rosca de Reyes - Mexican Kings Cake
Hello everybody! Well... it's almost time for our next celebration, at least in Mexico, we celebrate "Dia de Reyes" (Three Kings Day) ... If you want to know more about this tradition, well go to my post about it just click here... I'll just quote a little something from that post here...
- "In many cities in Mexico "Santa" is not the one who brings the presents but "The Three Kings". Early on January 6th morning many children received their toys! And as they play and enjoy what their gifts the adults get ready to have a "merienda" (an early evening dinner) where they will have the "ROSCA DE REYES" (Three Kings Cake) and hot chocolate or coffee!" -
So... this year I will be making my own... and I actually JUST made one to share the recipe and pictures with all of you... There are many versions of this bread... but this is one of the easiest you'll find and also way more delicious than store bought! I hope you enjoy it!
For the bread:
For the "crumb/sugar topping"
Additional toppings:
Directions:
Mix (with a plastic spoon and in a clean glass or plastic container) the dry yeast, warm milk and one tablespoon of sugar. Cover and let it rest in a warm dark place (it could be inside your oven) for 10 minutes
In a a mixing bowl add 1 cup of flour and the "yeast mixture" using the hook attachment mix for 1 minute, slowly add another cup of flour, salt, butter, eggs, sugar and continue mixing, incorporate remaining flour and add orange zest/vanilla and mix for about 4 minutes.
Transfer your dough to a floured surface and knead with your hands adding more flour until your dough is no longer sticky. Return dough to mixing bowl, cover with a damp cloth and let it rest for 2 hours inside your oven (it's better if it's a little warm but not hot), the secret with this bread is to be patient, you just have to "forget about your dough" for those 2 hours and not be uncovering it, it needs to rest like that to be able to rise and let the yeast do the work.
After the dough has doubled in size, kind of "punch it" with your knuckles (again on a slightly floured surface) to get the air out of the dough (punch it about 4 times only) then roll it out to form an oval and it should be about 1/2 inch thick.
Then starting from the further side from you start rolling your dough (not too tight but not loose either) towards you to form like a "taco"
Then grab your "roll", transfer to a slightly greased jelly roll pan and shape it into an oval, handling the dough to join the ends as much as you can with your fingers and then just kind of press the oval shaped roll down to flatten a little.
Cover with a damp cloth and transfer your oval shaped roll back to a warm/dark place and let it rest for another hour.
When the hour has passed now just "varnish" your dough using 1 slightly beaten egg and a pastry brush
It's time to make the crumb topping:
Just incorporate all the crumb topping ingredients (egg yolk, powdered sugar, salt, flour and vanilla) and don't over mix, roll it out and cut "stripes" that you will place on top of your "rosca" as you wish, it's a delicious topping, next time I will use more of it... but here's what I did:
Now just decorate with the fruit and the colored sugars and then sprinkle additional granulated sugar all over it!
Bake in preheated oven at 350F until a beautiful dark golden color shows (for about 20 up to 30 minutes, time might vary depending on the oven)
© Paloma K.
- "In many cities in Mexico "Santa" is not the one who brings the presents but "The Three Kings". Early on January 6th morning many children received their toys! And as they play and enjoy what their gifts the adults get ready to have a "merienda" (an early evening dinner) where they will have the "ROSCA DE REYES" (Three Kings Cake) and hot chocolate or coffee!" -
So... this year I will be making my own... and I actually JUST made one to share the recipe and pictures with all of you... There are many versions of this bread... but this is one of the easiest you'll find and also way more delicious than store bought! I hope you enjoy it!
Rosca de Reyes
For the bread:
- 2 tsp. active dry yeast
- 1/4 cup warm milk
- 3 1/2 cups all purpose flour
- 1/2 tsp. salt
- 1/2 cup unsalted butter (room temperature)
- 4 eggs
- 10 tablespoons of granulated sugar
- the zest of 1 orange
- 1 tsp. vanilla
For the "crumb/sugar topping"
- 1 egg yolk
- 1 pinch of salt
- 3/4 cup confectioners sugar
- 3/4 cup flour
- 1 stick of softened butter
- 1 tsp. vanilla
Additional toppings:
- 1 egg for "varnishing"
- Candied cherries and assorted candied fruits, like lemon/orange/lime candied peel and/or fruit cake mix
- Colored sugar (yellow/green/red are traditional colors)
- Granulated sugar to sprinkle
Directions:
Mix (with a plastic spoon and in a clean glass or plastic container) the dry yeast, warm milk and one tablespoon of sugar. Cover and let it rest in a warm dark place (it could be inside your oven) for 10 minutes
In a a mixing bowl add 1 cup of flour and the "yeast mixture" using the hook attachment mix for 1 minute, slowly add another cup of flour, salt, butter, eggs, sugar and continue mixing, incorporate remaining flour and add orange zest/vanilla and mix for about 4 minutes.
Transfer your dough to a floured surface and knead with your hands adding more flour until your dough is no longer sticky. Return dough to mixing bowl, cover with a damp cloth and let it rest for 2 hours inside your oven (it's better if it's a little warm but not hot), the secret with this bread is to be patient, you just have to "forget about your dough" for those 2 hours and not be uncovering it, it needs to rest like that to be able to rise and let the yeast do the work.
After the dough has doubled in size, kind of "punch it" with your knuckles (again on a slightly floured surface) to get the air out of the dough (punch it about 4 times only) then roll it out to form an oval and it should be about 1/2 inch thick.
![]() |
| I couldn't take pictures at this point but this is how you should roll your dough. |
Then starting from the further side from you start rolling your dough (not too tight but not loose either) towards you to form like a "taco"
![]() |
| (As you are rolling this would be the time to insert a couple of little plastic dolls that the traditional bread calls for, I left those out) |
Then grab your "roll", transfer to a slightly greased jelly roll pan and shape it into an oval, handling the dough to join the ends as much as you can with your fingers and then just kind of press the oval shaped roll down to flatten a little.
Cover with a damp cloth and transfer your oval shaped roll back to a warm/dark place and let it rest for another hour.
When the hour has passed now just "varnish" your dough using 1 slightly beaten egg and a pastry brush
It's time to make the crumb topping:
Just incorporate all the crumb topping ingredients (egg yolk, powdered sugar, salt, flour and vanilla) and don't over mix, roll it out and cut "stripes" that you will place on top of your "rosca" as you wish, it's a delicious topping, next time I will use more of it... but here's what I did:
Now just decorate with the fruit and the colored sugars and then sprinkle additional granulated sugar all over it!
Bake in preheated oven at 350F until a beautiful dark golden color shows (for about 20 up to 30 minutes, time might vary depending on the oven)
| ENJOY! |
© Paloma K.
Monday, December 31, 2012
Last post of the year.... Thanks and MORE!
Hello everybody! December has been hectic with good activities here "en Mi casa" which is "Tu Casa" too! I've had visits from Mexico, friends and family! I also had lots of baking to do and cooking, I sold tons of Christmas Cookies and Chocoflan Cake so I got a new camera with part of the money I made from alll the baking (I was soooo needing it for better pictures) and I've also been enjoying hubby being home! He's been off of of work for about a week now, he'll go back to work on Wednesday (I wish I was rich to keep him always to ourselves! LOL!) So... it's been impossible to post more often or reply but once things go back to normal I am sure everything will be better here!
I just want to take the opportunity to thank you all for being with me in 2012! This year has been the "come back" of "The Coffee Shop" and I've been very blessed to get to know more people through this blog! Thank you all for being here! For sharing, for commenting, for being so supportive! And for encouraging me with my projects! Thank you for trying my recipes!
I hope 2013 will be filled with new blessings that we can all share together!
Do you have any goals/resolutions for this year? Would you like to share? Whether they are personal or blogging goals... feel free to share
I lost 40 pounds in 2012 and I'm going for the rest this year! I hope I'll do a better job with homeschooling and finally have a serious calendar/schedule that I'll adhere too... and in the blogging area ... well... I hope our Coffee Friday Party just "takes off" !
By the way... join us this Friday ... we will have a featured blogger!
... Anything else? Well... I just wish you all a Happy and successful 2013!
© Paloma K.
I just want to take the opportunity to thank you all for being with me in 2012! This year has been the "come back" of "The Coffee Shop" and I've been very blessed to get to know more people through this blog! Thank you all for being here! For sharing, for commenting, for being so supportive! And for encouraging me with my projects! Thank you for trying my recipes!
I hope 2013 will be filled with new blessings that we can all share together!
Do you have any goals/resolutions for this year? Would you like to share? Whether they are personal or blogging goals... feel free to share
I lost 40 pounds in 2012 and I'm going for the rest this year! I hope I'll do a better job with homeschooling and finally have a serious calendar/schedule that I'll adhere too... and in the blogging area ... well... I hope our Coffee Friday Party just "takes off" !
By the way... join us this Friday ... we will have a featured blogger!
![]() |
| Pic: New Year's Eve 2007 ... I was the photographer -sigh- |
... Anything else? Well... I just wish you all a Happy and successful 2013!
© Paloma K.
Labels:
attitude,
blessings,
gratefulness,
holidays,
Mexican,
my randomness,
new year resolutions
Monday, December 17, 2012
Keeping our Lights Shining Bright!
Hi everybody! I promise I'll try to visit some blogs today! It's been really busy here... and then after the horrible tragedy in Connecticut I haven't been feeling like blogging... Such a horrible thing! It's made me sick to my stomach... My prayers with the families of the victims. May God's surpassing peace flood their hearts.
Today is a new day but even when it's new... nothing will be the same... what happened in that school, may it be something that we always remember, to use it for something good, if possible... hug more our children, kiss them every time, avoid holding grudges, focus on what matters most...
This Christmas hold your loved ones tight! Don't focus on gifts but focus on Jesus, on His love, eternal, perfect, pure! And rejoice in that love with those around you! The events made me want to turn my Christmas lights off... I thought: "how can we be celebrating in the middle of so much pain?" But how can we not? When our hearts ache most we need to remember and celebrate that Jesus was born! in the darkest hour His light continues to shine! His light came to this dirty, painful world that didn't even want Him but that so desperately needed Him... and we continue to need Him today, my Christmas lights are shining to remember that! not just for "decoration" ... Let your lights shine this Christmas... not to represent "wealth, parties and good times" but to reflect on the fact that this dark world needs Him, and if we don't let our lights shine... who will?
John: 8:12 -Then Jesus spoke to them again, saying, “I am the light of the world. He who follows Me shall not walk in darkness, but have the light of life.”-
© Paloma K.
Today is a new day but even when it's new... nothing will be the same... what happened in that school, may it be something that we always remember, to use it for something good, if possible... hug more our children, kiss them every time, avoid holding grudges, focus on what matters most...
This Christmas hold your loved ones tight! Don't focus on gifts but focus on Jesus, on His love, eternal, perfect, pure! And rejoice in that love with those around you! The events made me want to turn my Christmas lights off... I thought: "how can we be celebrating in the middle of so much pain?" But how can we not? When our hearts ache most we need to remember and celebrate that Jesus was born! in the darkest hour His light continues to shine! His light came to this dirty, painful world that didn't even want Him but that so desperately needed Him... and we continue to need Him today, my Christmas lights are shining to remember that! not just for "decoration" ... Let your lights shine this Christmas... not to represent "wealth, parties and good times" but to reflect on the fact that this dark world needs Him, and if we don't let our lights shine... who will?
John: 8:12 -Then Jesus spoke to them again, saying, “I am the light of the world. He who follows Me shall not walk in darkness, but have the light of life.”-
© Paloma K.
Labels:
Christian,
Christmas,
Connecticut,
decoration,
holidays,
shooting,
tragedies,
world events
Friday, December 14, 2012
Coffee Friday - Update
Hello everybody! Just to let you know Coffee Friday will be back after the Holidays! Our next Coffee Party will be on Friday January 4th, 2013! Keep taking pics of your coffee mug, coffee stains, coffee beans.... even a coffee ring! Anything coffee! send them to my e-mail love.for.coffee@gmail.com to be featured here or just mention "coffee", even if just randomly, on any of your posts to link up with us!
Here is our Coffee Party button...
Enjoy!
© Paloma K.
Here is our Coffee Party button...
Enjoy!
© Paloma K.
Monday, December 10, 2012
Picture Post!
ooh! Lots of catching up to do replying and commenting on other blogs! I hope once January starts everything goes back to normal and I can blog more... I just want to say I'm here, we're enjoying the feeling of Christmas all around us and ... well... here are some pics of how we're enjoying!
© Paloma K.
| Paper Snowflakes |
| More Crafts |
| Nutcracker! |
| Love! |
| My princesses |
| Of course! |
© Paloma K.
Wednesday, December 5, 2012
Christmas Cookies - Christmas Wreaths
Hello everybody! I have a very easy (and fun) recipe to make Christmas wreaths... These are not exactly my favorite cookie in flavor.... You know? but I always feel like they are a MUST HAVE for how festive and "Christmassy" they are!
Before I share the recipe let me give you a quick update on our Coffee Friday... I will be re-taking it in January! I already have some great bloggers that will be featured! So... don't think that we're done with our Coffee Party! Keep posting and mentioning "coffee" in your posts so you will be able to link up with us! Our Next Coffee Friday will be on the 4th of January 2013! Do not miss it! Here is our Coffee Friday button if you want to add it to your blog as a reminder!
Now... Our Recipe:
Christmas Wreaths:
© Paloma K.
Before I share the recipe let me give you a quick update on our Coffee Friday... I will be re-taking it in January! I already have some great bloggers that will be featured! So... don't think that we're done with our Coffee Party! Keep posting and mentioning "coffee" in your posts so you will be able to link up with us! Our Next Coffee Friday will be on the 4th of January 2013! Do not miss it! Here is our Coffee Friday button if you want to add it to your blog as a reminder!
Christmas Wreaths:
Ingredients:
|
|
Directions:
| 1. | Line baking sheets with waxed paper. Set aside. Melt the butter in a large saucepan over low heat. Add marshmallows, cook until melted while stirring constantly. Remove from heat, add food coloring, vanilla, and cornflakes. | |||
| 2. | Quickly drop heaping tablespoonfuls (I use a small ice cream scoop) of the mixture onto waxed paper, and form into a wreath shape with lightly greased fingers. Immediately decorate with red hot candies. Place them in the fridge to chill before removing from waxed paper, and storing in an airtight container. |
Note: it really helps if someone - a little one even - helps you add the hot candies as you shape the wreaths so they stick better.
Have fun!
Tuesday, December 4, 2012
Christmas Traditions
Hello everybody! I hope you've been enjoying the recipes I've shared with you! I've posted several cookie recipes and you can also check my Recipe Index for more yummy dishes/desserts!
Today... I want to ask you about Christmas traditions... Do you have any? Anything that you do with your family every year that you all enjoy? some little thing that you probably haven't even realized it's a tradition but you love doing on Christmas?
Share with everyone here... maybe someone will read them and even make your family tradition their own!
Something we do here every Christmas season is watch the movie:
Such a beautiful movie!! We watch it a week or two before Christmas. We also love "White Christmas" and something we do on the very Christmas day is sing Christmas Carols with song books made for the whole family, the Christmas songs books get out at some point in the night and everybody sings together and Josh (my hubby) reads some Bible verses on the Birth of Jesus between some of the songs. It's very beautiful and we used to do this with hubby's family but now that we moved to Texas we "skype" to "be" with them.
Do you do anything special? I'd love to read all about it!
© Paloma K.
Today... I want to ask you about Christmas traditions... Do you have any? Anything that you do with your family every year that you all enjoy? some little thing that you probably haven't even realized it's a tradition but you love doing on Christmas?
Share with everyone here... maybe someone will read them and even make your family tradition their own!
Something we do here every Christmas season is watch the movie:
Such a beautiful movie!! We watch it a week or two before Christmas. We also love "White Christmas" and something we do on the very Christmas day is sing Christmas Carols with song books made for the whole family, the Christmas songs books get out at some point in the night and everybody sings together and Josh (my hubby) reads some Bible verses on the Birth of Jesus between some of the songs. It's very beautiful and we used to do this with hubby's family but now that we moved to Texas we "skype" to "be" with them.
Do you do anything special? I'd love to read all about it!
© Paloma K.
Monday, December 3, 2012
Christmas Cookie Series - Haystacks!
Hello everyone! Here I am just trying to at least get to post something! I will also dedicate some of my time today to stop by some blogs that have been kind enough to leave a comment here! Thank you all! for reading, liking, sharing, pinning!
Now... Let me share a quick and easy recipe to make the very popular "Haystacks" which are also known as "Chinese Cookies" and "Chow Mein Cookies"
There are many recipes out there... but these is the one I've found to be simpler and yummy... of course you can modify it to your own taste.
Haystacks (aka chow mein cookies/chinese cookies)

© Paloma K.
Now... Let me share a quick and easy recipe to make the very popular "Haystacks" which are also known as "Chinese Cookies" and "Chow Mein Cookies"
There are many recipes out there... but these is the one I've found to be simpler and yummy... of course you can modify it to your own taste.
Haystacks (aka chow mein cookies/chinese cookies)
| Ingredients |
|

| Directions (First of all line two big baking sheets with parchment paper) |
|
© Paloma K.
Thursday, November 29, 2012
Christmas Cookies Series - Mexican Wedding Cakes
Hi dear friends! Thank you for stopping by at The Coffee Shop! Today... I bring to you... one of my very favorite kind of cookie: Mexican Wedding Cakes aka Russian Tea Cakes
I just love this melt-in-your mouth good cookies! They are buttery and deliciously rolled in powdered sugar... They are very delicate and just perfect for Christmas!
Today I made a batch... and I know I'll be baking many more! Yes... again... this recipe was shared to my by one of hubby's aunts!
Mexican Wedding Cakes aka Russian Tea Cakes
Yield: 48 cookies
Ingredients:
Preheat Oven at 400F.
In a mixing bowl cream Butter, Add sugar and mix to incorporate, gradually add salt, vanilla, flour and nuts (in that order) just until incorporated. Mixture will be a little stiff. Pinch small amounts of dough to make 1" balls. Bake on ungreased sheet for 8-10 minutes just until bottoms are golden and the cookies show tiny cracks on them. Roll warm cookies in powdered sugar; cool on wire rack. Roll in powdered sugar again.
Enjoy!
© Paloma K.
I just love this melt-in-your mouth good cookies! They are buttery and deliciously rolled in powdered sugar... They are very delicate and just perfect for Christmas!
Today I made a batch... and I know I'll be baking many more! Yes... again... this recipe was shared to my by one of hubby's aunts!
Mexican Wedding Cakes aka Russian Tea Cakes
Yield: 48 cookies
Ingredients:
- 1 cup butter
- 1/2 cup powdered sugar (plus more for rolling)
- 1/4 tsp. salt
- 1 tsp. vanilla
- 2 cups of flour
- finely chopped nuts (optional, although, authentic Russian Tea Cakes ALWAYS include nuts)
Preheat Oven at 400F.
In a mixing bowl cream Butter, Add sugar and mix to incorporate, gradually add salt, vanilla, flour and nuts (in that order) just until incorporated. Mixture will be a little stiff. Pinch small amounts of dough to make 1" balls. Bake on ungreased sheet for 8-10 minutes just until bottoms are golden and the cookies show tiny cracks on them. Roll warm cookies in powdered sugar; cool on wire rack. Roll in powdered sugar again.
Enjoy!
© Paloma K.
Wednesday, November 28, 2012
Christmas and Thumbprints
Hello everybody... How are you doing? I hope you're all excited about Christmas! I know some of you might not celebrate it... But it's a big deal here in our house. We are all excited about this season! I've hope everybody who does celebrate Christmas makes sure to celebrate it peacefully and with a joyful heart! Remembering that the Reason to celebrate is Jesus... When we remember that... then nothing can go wrong... Because Jesus was born NO matter what. I know this is a hard season for many, those who have lost someone dear to their hearts or those who might be struggling financially... I am not trying to minimize anybody's situation but I am just trying to help us keep in mind that He was still born... He was born in a dark world that needed His light and salvation, that first Christmas was pretty "frugal" if you remember... But there were still angels singing! And they still are... singing to our Savior! Let's join the angelical choir regardless of our situation...
So...
Now that I've shared a little bit about Christmas... let me ask you... will you be baking cookies? as I said previously... we don't need to get too stressed about anything and Christmas is not about food, money or even about family... it's all about Him... but still... it's great when we can share this wonderful season with those we love while enjoying some good food... not indispensable... but ... it's nice if we can do it... Today I want to share with you a recipe that I found in the "Living" Magazine by Martha Stewart...
Thumbprints with Raspberry Jam and Pistacchio
Ingredients
© Paloma K.
So...
Now that I've shared a little bit about Christmas... let me ask you... will you be baking cookies? as I said previously... we don't need to get too stressed about anything and Christmas is not about food, money or even about family... it's all about Him... but still... it's great when we can share this wonderful season with those we love while enjoying some good food... not indispensable... but ... it's nice if we can do it... Today I want to share with you a recipe that I found in the "Living" Magazine by Martha Stewart...
Thumbprints with Raspberry Jam and Pistacchio
![]() |
| Still in the "Filling" process |
Ingredients
- 3 cups all-purpose flour
- 3/4 teaspoon baking powder (omit if making thumbprints, ball cookies, or spritz cookies)
- 1/2 teaspoon salt
- 2 sticks unsalted butter
- 1 cup sugar
- 1 large egg
- 2 teaspoons pure vanilla extract
- 3/4 cup chopped pistachios or sanding sugar (optional)
- 1/2 cup raspberry jam
Directions
- Whisk together flour, baking powder, and salt in a large bowl. Beat butter and granulated sugar with a mixer on medium-high speed until pale and fluffy. Beat in egg and vanilla. Reduce speed to low. Add flour mixture, and beat until combined.
- Roll dough into 1-inch balls, then roll in finely chopped nuts or sanding sugar, if using. Arrange on parchment-lined baking sheets, spacing each 1 inch apart.
- Press a well into the center of each using your finger. Refrigerate until firm, about 30 minutes. Bake at 350 degrees for 7 minutes. Remove from oven, and press well again with handle end of a wooden spoon. Bake until firm, 7 to 9 minutes more.
- Let cool completely. Spoon jam filling into thumbprints.
© Paloma K.
Sunday, November 25, 2012
Thanksgiving through the eyes of a Mexican!
Sorry I've been away... Thanksgiving was great here! We had so much stuff to eat but most of all we gave thanks, shared what we are thankful for and had a great time with family! My brother, his wife and my sister were able to spend some time with us, they came from Mexico specifically to spend Thanksgiving with us. Thanksgiving is not celebrated in Mexico since it doesn't really have anything to do with our history... but in my house there's been always love towards the American beginnings and its history... I've also always loved the whole Thanksgiving Tradition because, when in Mexico, living right at the Border with USA I had some friends who lived in Texas and they did celebrate it! I even got to be part of one Thanksgiving Dinner and I know I still didn't get the "whole experience" because there were "tamales" involved! LOL! ... I wanted to know what the traditional meal was really like... but never occurred to me that one day I would be hosting my own! I try to keep it as traditional as possible to make sure hubby enjoys everything he loves about it and also to share it with my Mexican family, who also appreciate it all... it's so different from our traditional food in Mexico! so they get the taste of what Josh (my husband) grew up with!
So... Here are some pictures of what we enjoyed here...
So... That was our Thanksgiving... we are very thankful for all our blessings, most of all for salvation, family and good health.
Now... I am gearing up for Christmas! I just wish there weren't so many events in between so I can lose more pounds and not be tempted with more food! LOL! ... I am already getting recipes, memories and just random thoughts on Christmas to share with you!
© Paloma K.
So... Here are some pictures of what we enjoyed here...
| Our Thanksgiving Table (Thanksgiving Tree in the back) |
| My girl! |
| Appetizers: Stuffed Celery, Pretzels, Deviled Eggs |
| My littlest one! Enjoying too! |
| Everyone happy! |
| With my sister and my brother! |
| With my hubby! |
| YUM! |
| Pumpkin Pie, Pecan Pie, Sugar Cookies, Pumpkin Brownies, M&M's |
So... That was our Thanksgiving... we are very thankful for all our blessings, most of all for salvation, family and good health.
Now... I am gearing up for Christmas! I just wish there weren't so many events in between so I can lose more pounds and not be tempted with more food! LOL! ... I am already getting recipes, memories and just random thoughts on Christmas to share with you!
© Paloma K.
Thursday, November 22, 2012
Sunday, November 18, 2012
My Thanksgiving Tree
I finally got the chance to make this! I've been wanting to make it from the very beginning of November but my girls have been sick and I just couldn't gather the inspiration to make it! Last night I decided this couldn't wait any longer, once the girls went to bed and regardless of being tired, I made it. It was easy because I already had what I needed and hubby helped me put the branch in the pot while I traced, cut and "prepared" the leaves. The branch is in a pot and inside the pot there's cardboard to make it steady, the cardboard is cut round to have a tight fit inside the pot, with a hole in the middle for the branch to go through it... so... there's rocks, cardboard, rocks, cardboard and more rocks on top. Those rocks you can buy in the gardening section of any big store. I bought a bag of them last year in Home-Depot.
The leaves are made with brown and yellow cardstock, The shape of the leaves I got it from some artificial leaves I have, you can find great leaf shapes from clip-art or even looking for leaf images online.Once I traced and cut the leaves I just colored their edges with crayon to give them a more "real" look. (used brown crayon for the yellow leaves, dark orange crayon for the brown leaves).
Then I just wrote the things we are thankful for, used some yellow sewing thread to hang them (passed the thread throw the leaf stem with a needle) and hung all the leaves on my branch (you need a dry, "nice looking" branch) the size of it will depend on the size of your pot.
Voila! You have a cute, earthy looking, Thanksgiving Tree!
© Paloma K.
Labels:
attitude,
blessings,
crafts,
holidays,
Thanksgiving
Saturday, November 17, 2012
Candied Sweet Potatoes - Two Ways!
Ok... Thanksgiving is pretty much over us, I just came back from doing Thanksgiving Grocery Shopping! Oh wow! Expensive! and I am trying to keep it simple!
So I know I haven't gone through my whole Menu and shared all of my recipes with you... but here I am ... This time I am bringing two recipes on how to make candied sweet potatoes... I don't like sweet potatoes, so they are not even on my menu, but I know this is a "Thanksgiving Staple" and a favorite of many
These recipes were shared with me by two of hubby's aunts... Auntie Sally (you've heard a lot about her here!) and Auntie Janet, well, she sent me Grandma's recipe. I trust them both with their recipes but this seems to be a dish where "the sisters" disagree! LOL! .. I am sure they are both great (If you like sweet potatoes)
So... here they are! Choose your favorite:
Auntie Sally's Candied Sweet Potatoes: (** Original Notes by Auntie Sally)
Ingredients:
**I
definitely bake them and don't put them in a slow cooker or anything
like that. I think the texture and richness is not obtained unless they
go in the oven. There may be a discrepancy among the aunts on that.
Grandma Shirley's Easy Candied Sweet Potatoes (**Original Notes by Auntie Janet)
** Here is the recipe for the sweet potatoes that Grandma gave me.
Ingredients:
Aren't they great? Ah! I love hubby's family! And I love it that they all took the time last Thanksgiving to share all this with me! I am respecting their secrets though... I am only sharing the recipes that I know they don't mind sharing... those recipes that I was told: "This is just for your eyes" well... it's stayed that way!
I hope you like these recipes, let me know which one you picked!
© Paloma K.
So I know I haven't gone through my whole Menu and shared all of my recipes with you... but here I am ... This time I am bringing two recipes on how to make candied sweet potatoes... I don't like sweet potatoes, so they are not even on my menu, but I know this is a "Thanksgiving Staple" and a favorite of many
These recipes were shared with me by two of hubby's aunts... Auntie Sally (you've heard a lot about her here!) and Auntie Janet, well, she sent me Grandma's recipe. I trust them both with their recipes but this seems to be a dish where "the sisters" disagree! LOL! .. I am sure they are both great (If you like sweet potatoes)
So... here they are! Choose your favorite:
Auntie Sally's Candied Sweet Potatoes: (** Original Notes by Auntie Sally)
Ingredients:
- 6 medium yams
- 1/2 c. brown sugar
- 1/2 c. Karo syrup
- 1/4 c. butter
Directions:
- Preheat oven at 375F. Bake yams until fork tender (not too tender,they'll fall apart) about 25-30 mins. Peel and cut into pieces 2x2 or so. Layer in a baking dish, 8x8 or larger depending on how much you have, single layer is best.
- In the meantime combine sugar, syrup and butter and bring to a boil. Reduce to low heat and simmer 5 min. Stir occasionally.
- Pour syrup mixture over potatoes and bake, about 50 minutes basting 1 or 2 times.
** I do cover with foil and remove it in the last 5-10 minutes.
- They should have a nice glazed look, not crispy.
-------------
Grandma Shirley's Easy Candied Sweet Potatoes (**Original Notes by Auntie Janet)
** Here is the recipe for the sweet potatoes that Grandma gave me.
Ingredients:
- 3- 16oz cans whole sweet potatoes (drained) slice into nice size pieces if you need too.
- 3/4 cup packed brown sugar
- 3/4 cup dark corn syrup
- 6 Tablespoons butter
- Drain the sweet potatoes and put into a 13x9" pan. Heat the brown sugar, dark corn syrup, and butter bring to a boil. Simmer stirring for 5 minutes. Pour syrup over sweet potates and bake for 30 minutes. I baste the sweet potates with the syrup after 15 minutes just to keep the tops of the potates from drying out.
Aren't they great? Ah! I love hubby's family! And I love it that they all took the time last Thanksgiving to share all this with me! I am respecting their secrets though... I am only sharing the recipes that I know they don't mind sharing... those recipes that I was told: "This is just for your eyes" well... it's stayed that way!
I hope you like these recipes, let me know which one you picked!
© Paloma K.
Subscribe to:
Posts (Atom)