Printfriendly

Print Friendly and PDF
Showing posts with label Thanksgiving. Show all posts

Thursday, October 23, 2014

Because I can... Guilt free Pumpkin Muffins!

Good day everyone! I am really excited to report that I have some great healthy desserts to share with you... But before getting there let me invite you to do something... would you please check Torch Coffee out? I am not being compensated in any way to do this... this is just a personal recommendation... when you go through their different choices pick your very favorite one (or two) and come back on Monday when I'll have an amazing discount exclusive for my readers. I have fallen in love with their company and what they do for people through their business.... but more on that later... for now just check out their page and start thinking what you're going to get when I share the promo code ....

And now... the dessert... Well... it's fall! Right? And even when in Texas is just starting to feel like "Summer feels in Wisconsin" at least it's not unbearably hot... plus, my newsfeed is filled with all things pumpkin! So one would think it is impossible to be a good girl with all that temptation around! Well... think twice! If you're already a part of the Trim Healthy Mama movement then you know what I am talking about... It IS possible to eat healthy, stay trim (or get there) and ENJOY LIFE! If you don't know what I am talking about then go ahead and start following these ladies that are losing so much weight by adding more butter to their food (I'm not kidding!) Facebook THM ... Now... if you are not on Trim Healthy Mama and do not care about weight loss but only eating healthy, avoiding gluten and sugar, etc... this recipe is for you too... here it goes:

Ah! Fall.. I am ready for you!


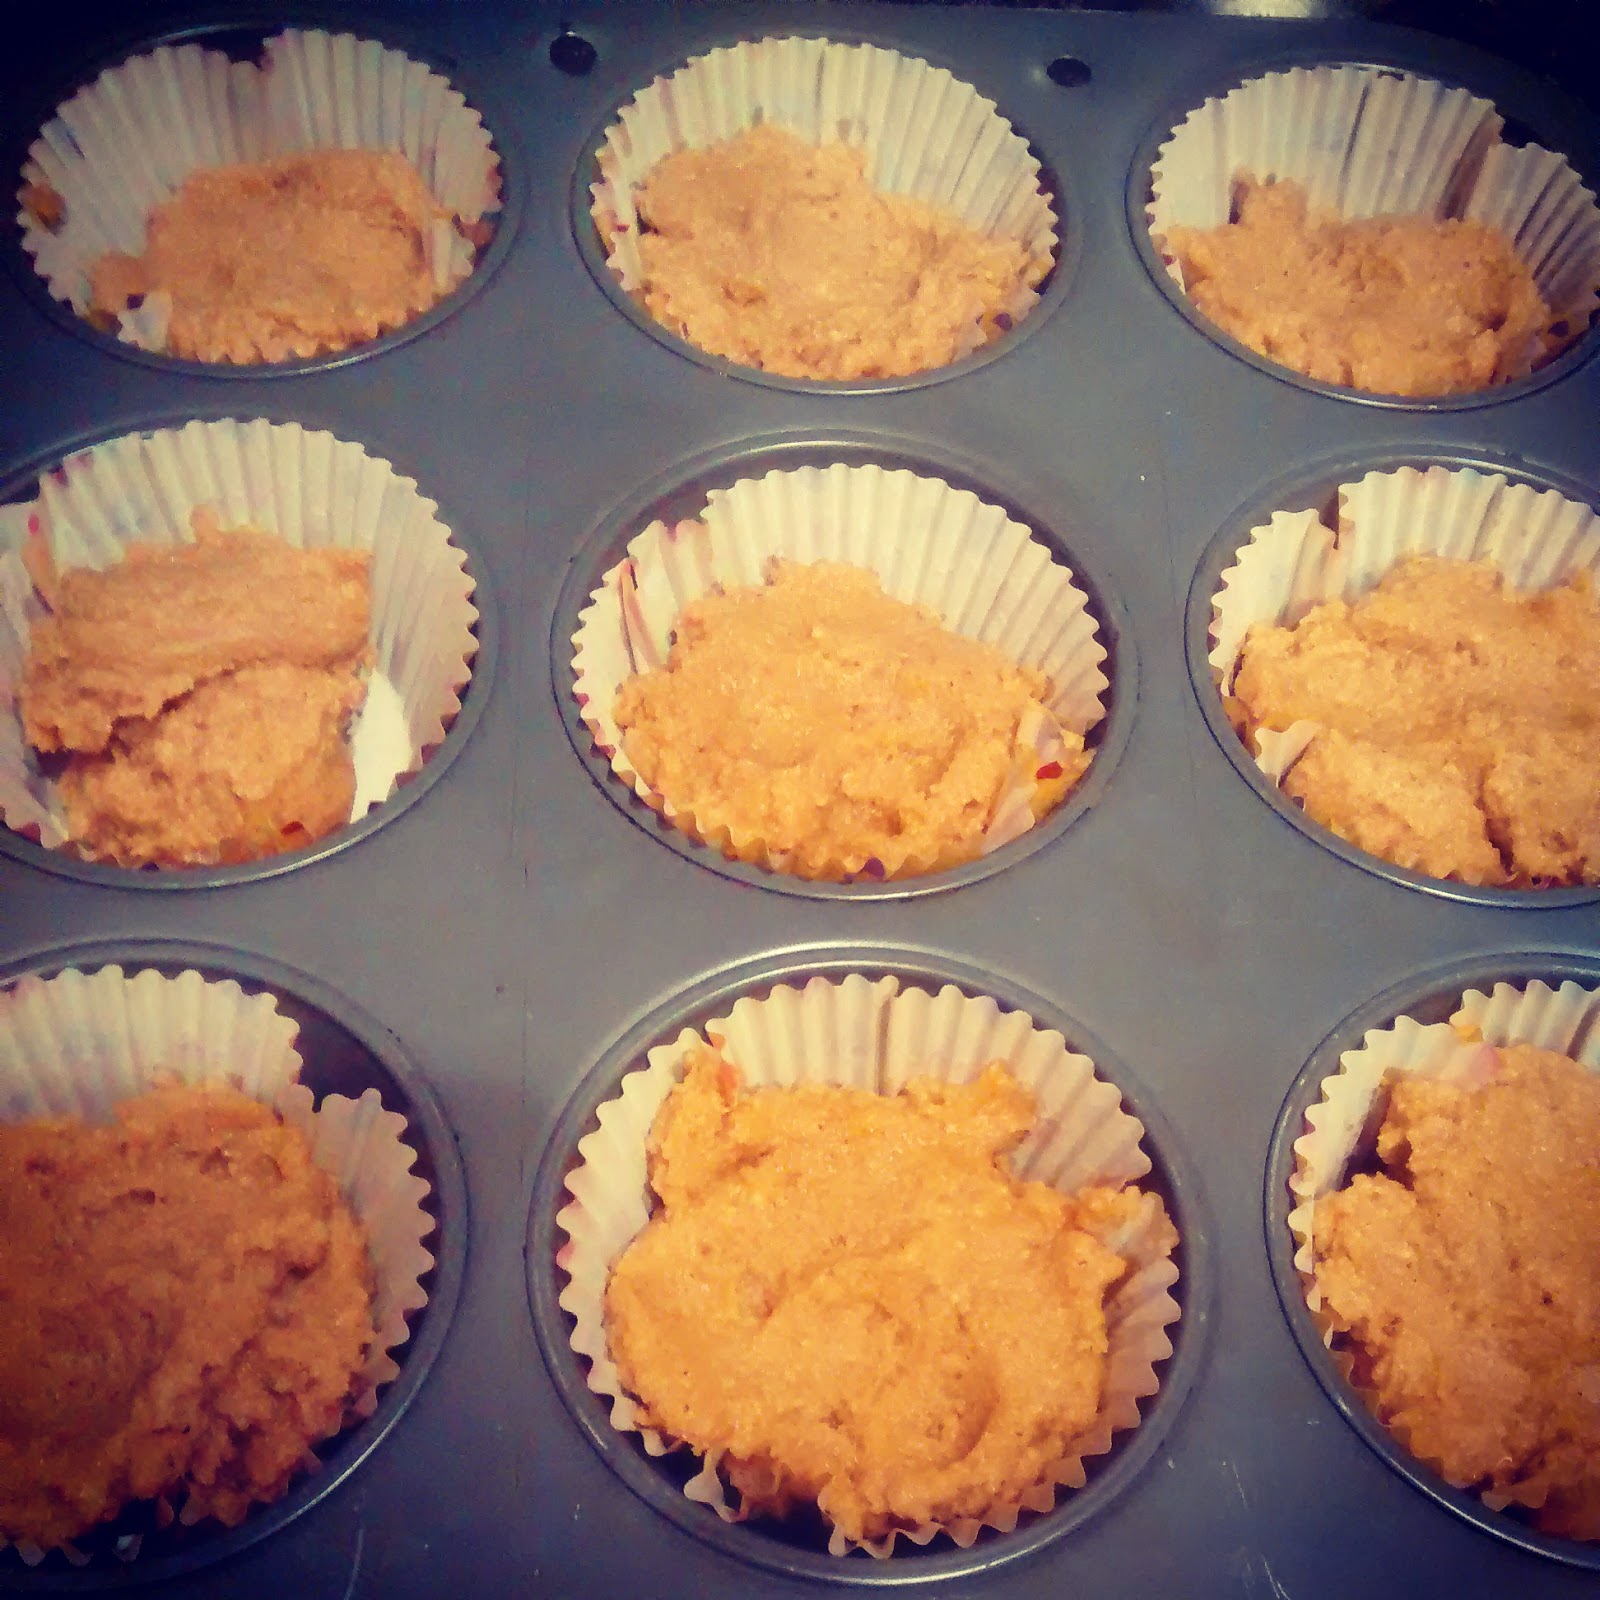
Right before going in the oven

Pumpkin Muffins - THM Style (S dessert)
Slightly adapted from: Empowered Sustenance

Ingredients
  • 1/2 cup coconut flour (I like this one )
  • 4 eggs, at room temperature
  • 1/4 cup coconut oil (unsalted butter is good too)
  • 7 Tbs. pumpkin puree (I use Libby's, whatever you use make sure it is unsweetened)
  • 2 Tbs. Real Birch Xylitol -make sure you measure your xylitol, then grind it - xylitol is already granulated but grinding it right before using it helps incorporate it and sweeten evenly. (You can use Honey or Real maple syrup instead if you're not on THM or trying to lose weight)
  • 1 tsp. cinnamon or pumpkin pie spice
  • 1/4 tsp. ground ginger
  • 1 tsp. vanilla extract
  • 1 tsp. apple cider vinegar
  • 1/4 tsp. baking soda
Instructions
  1. Preheat the oven to 350 degrees and lightly grease or line 10 muffin cups.
  2. Stir together the coconut flour and eggs, whisk until there is no dry coconut flour, it should look like a smooth paste. Stir in the coconut oil (or butter), then the pumpkin puree and sweetener of choice (xylitol or honey). Then mix in the spices, cider vinegar and baking soda.
  3. Divide evenly in prepared muffin pan. Bake for about 25-30 minutes, until golden and the top springs back when lightly pressed.
I've been so happy making these! I've been even carrying them with me when having breakfast at church for our Ladies Bible Study! I enjoy them with a cup of coffee knowing that I am still on plan while at the same time enjoying with friends! Bye-bye deprivation! Hello Thanksgiving Dinner! I am ready for you!

I hope you enjoy these as much as I did.

© Paloma K.

 Disclaimer: This post may contain affiliate links.

Sunday, November 25, 2012

Thanksgiving through the eyes of a Mexican!

 Sorry I've been away... Thanksgiving was great here! We had so much stuff to eat but most of all we gave thanks, shared what we are thankful for and had a great time with family! My brother, his wife and my sister were able to spend some time with us, they came from Mexico specifically to spend Thanksgiving with us. Thanksgiving is not celebrated in Mexico since it doesn't really have anything to do with our history... but in my house there's been always love towards the American beginnings and its history... I've also always loved the whole Thanksgiving Tradition because, when in Mexico, living right at the Border with USA I had some friends who lived in Texas and they did celebrate it! I even got to be part of one Thanksgiving Dinner and I know I still didn't get the "whole experience" because there were "tamales" involved! LOL! ... I wanted to know what the traditional meal was really like... but never occurred to me that one day I would be hosting my own! I try to keep it as traditional as possible to make sure hubby enjoys everything he loves about it and also to share it with my Mexican family, who also appreciate it all... it's so different from our traditional food in Mexico! so they get the taste of what Josh (my husband) grew up with!

So... Here are some pictures of what we enjoyed here...

Our Thanksgiving Table (Thanksgiving Tree in the back)

My girl!


Appetizers: Stuffed Celery, Pretzels, Deviled Eggs

My littlest one! Enjoying too!

Everyone happy!
With my sister and my brother!

With my hubby!

YUM!
Pumpkin Pie, Pecan Pie, Sugar Cookies, Pumpkin Brownies, M&M's

So... That was our Thanksgiving... we are very thankful for all our blessings, most of all for salvation, family and good health.

Now... I am gearing up for Christmas! I just wish there weren't so many events in between so I can lose more pounds and not be tempted with more food! LOL! ... I am already getting recipes, memories and just random thoughts on Christmas to share with you!


© Paloma K.

Thursday, November 22, 2012

Sunday, November 18, 2012

My Thanksgiving Tree


I finally got the chance to make this! I've been wanting to make it from the very beginning of November but my girls have been sick and I just couldn't gather the inspiration to make it! Last night I decided this couldn't wait any longer, once the girls went to bed and regardless of being tired, I made it. It was easy because I already had what I needed and hubby helped me put the branch in the pot while I traced, cut and "prepared" the leaves. The branch is in a pot and inside the pot there's cardboard to make it steady, the cardboard is cut round to have a tight fit inside the pot, with a hole in the middle for the branch to go through it... so... there's rocks, cardboard, rocks, cardboard and more rocks on top. Those rocks you can buy in the gardening section of any big store. I bought a bag of them last year in Home-Depot.

The leaves are made with brown and yellow cardstock, The shape of the leaves I got it from some artificial leaves I have, you can find great leaf shapes from clip-art or even looking for leaf images online.Once I traced and cut the leaves I just colored their edges with crayon to give them a more "real" look. (used brown crayon for the yellow leaves, dark orange crayon for the brown leaves).

Then I just wrote the things we are thankful for, used some yellow sewing thread to hang them (passed the thread throw the leaf stem with a needle) and hung all the leaves on my branch (you need a dry, "nice looking" branch) the size of it will depend on the size of your pot.

Voila! You have a cute, earthy looking, Thanksgiving Tree!
 
© Paloma K.

Saturday, November 17, 2012

Candied Sweet Potatoes - Two Ways!

 Ok... Thanksgiving is pretty much over us, I just came back from doing Thanksgiving Grocery Shopping! Oh wow! Expensive! and I am trying to keep it simple!

So I know I haven't gone through my whole Menu and shared all of my recipes with you... but here I am ... This time I am bringing two recipes on how to make candied sweet potatoes... I don't like sweet potatoes, so they are not even on my menu, but I know this is a "Thanksgiving Staple" and a favorite of many

These recipes were shared with me by two of hubby's aunts... Auntie Sally (you've heard a lot about her here!) and Auntie Janet, well, she sent me Grandma's recipe. I trust them both with their recipes but this seems to be a dish where "the sisters" disagree! LOL! .. I am sure they are both great (If you like sweet potatoes)

So... here they are! Choose your favorite:


Auntie Sally's Candied Sweet Potatoes: (** Original Notes by Auntie Sally)

Ingredients:
  • 6 medium yams
  • 1/2 c. brown sugar
  • 1/2 c. Karo syrup
  • 1/4 c. butter
Directions: 
  •  Preheat oven at 375F. Bake yams until fork tender (not too tender,they'll fall apart) about 25-30 mins.  Peel and cut into pieces 2x2 or so.  Layer in a baking dish, 8x8 or larger depending on how much you have, single layer is best.
  • In the meantime combine sugar, syrup and butter and bring to a boil.  Reduce to low heat and simmer 5 min. Stir occasionally.
  • Pour syrup mixture over potatoes and bake, about 50 minutes basting 1 or 2 times.
** I do cover with foil and remove it in the last 5-10 minutes.
  • They should have a nice glazed look, not crispy.
**I definitely bake them and don't put them in a slow cooker or anything like that.  I think the texture and richness is not obtained unless they go in the oven.  There may be a discrepancy among the aunts on that.

-------------

Grandma Shirley's Easy Candied Sweet Potatoes (**Original Notes by Auntie Janet)

 ** Here is the recipe for the sweet potatoes that Grandma gave me.
 

Ingredients:   
  •  3- 16oz cans whole sweet potatoes (drained) slice into nice size pieces if you need too.
  •  3/4 cup packed brown sugar
  •  3/4 cup dark corn syrup
  •  6 Tablespoons butter
Directions:
  •  Drain the sweet potatoes and put into a 13x9" pan.  Heat the brown sugar, dark corn syrup, and butter bring to a boil.  Simmer stirring for 5 minutes. Pour syrup over sweet potates and bake for 30 minutes. I baste the sweet potates with the syrup after 15 minutes just to keep the tops of the potates from drying out.   
 **    Love Auntie Janet

 Aren't they great? Ah! I love hubby's family! And I love it that they all took the time last Thanksgiving to share all this with me! I am respecting their secrets though... I am only sharing the recipes that I know they don't mind sharing... those recipes that I was told: "This is just for your eyes" well... it's stayed that way!

I hope you like these recipes, let me know which one you picked!

© Paloma K.

Monday, November 12, 2012

Share your Holiday Disasters AND get unplugged!

Hi everyone! Today I am asking everyone to share about their "Holiday Disasters" on my Facebook Page. I hope I get good stories, things we can now all laugh about and also to be encouraged! As you know I've been sharing tips and ideas to make the Thanksgiving Dinner an enjoyable event, not only for the guests but for the host/hostess as well! This doesn't have to be something you just want to "get it over with" but a special time to show your loved ones how special they are... not through perfection, but through YOUR best (not a Magazine's Best), through your smile (not faked, but a relaxed, sincere one), through your ability to have fellowship with them.

 Another tip I am going to share... and ... forgive me if it seems "too much" but... let's make a deal... do not discard it immediately, bare with me...

ehem... Here I go

"Turn off the TV and... avoid the cell phone"

 And this I say with my deepest, sincerest love and respect... but... why do we have to stare at a screen all the time? You can watch that show (or football game) maybe online, maybe later (DVR), you can send that text some other time... But we never have the certainty we will all have another Thanksgiving together... And I don't mean this to be a gloomy post... but I just want to encourage, all of us, to treasure each moment when you get to spend time with the family and, if you have little ones, it's a great opportunity to teach them what's really valuable! We can turn our "screens" off for PEOPLE, people are important! Family is important! If the Turkey is dry, if the cookies are flat, if the Pumpkin pie is still jiggly and the pecans burnt... that doesn't matter... everything will end up in the toilet! (sorry about the expression) but it's true! Laugh about it! It's great to have a perfect meal! But life wouldn't be as enjoyable if everything was perfect! We wouldn't have funny stories to share if nothing went wrong once in a while! Take a picture of your burnt cookies, your mismatched napkins, your chipped gravy boat... and laugh about it! Turn it into a story to talk about after dinner!

My first time Baking Christmas Cookies... I didn't add peanut butter to Peanut butter cookies - LOL!

Don't let all the guys go watch football while all the girls talk at the table about what could've gone better ... it's a great opportunity for everyone to visit! Make a Thanksgiving Tree or just have everyone write in a piece of paper what they're thankful for this year so then you can all read about it later, turn it into a game by mixing the "thankful notes" and trying to guess who wrote what!

This is such a great opportunity to create more moments to be thankful for!

I got good hugs this Thanksgiving. I don't think those watching the football game have as many good memories as I do!

So... now... share... what are your biggest "Holiday Disasters" ... anything we can now laugh about?


© Paloma K.

Thursday, November 8, 2012

Update and Old-Fashioned Pecan Pie!

Hello everyone! Happy Thursday! I am sorry I didn't post my usual/traditional quotes on Tuesday! it's been busy here and I've been a little bit under the weather...

Sunday was a very emotional day in church... it was "Adoption Sunday" and ... well... everything that has to do with children being abandoned/abused, etc just really affects me... then we attended an Adoption Forum in the evening... and all the stories just break my heart and actually have physical consequences! I just felt sick for the next two days... We're praying about adoption... it's not something certain... but ... we're open to look into it.

 Then on Tuesday (still not entirely well)  I went with a group of ladies from church to the Houston Mission Centers, I was a little hesitant about going... because of how I was feeling but it was a blessing and we had a blast! Bagging Rice/Beans, Sweeping, organizing skates for the children who go and play there, inflating balls, weeding in the gardens, making bags of candy, etc... (I didn't do all that, I am just mentioning the chores that were assigned to all of us) ... so... that was a good reason to not be able to blog, don't you think? Here is a picture of all of us!

I am the first one standing from left to right

Yesterday, I just took it a little slower and I did feel better! I think I was needing a break... Today... well, here I am! Looking forward to tomorrow's Coffee Friday! Did you think I forgot? Well no! So I hope you join us!

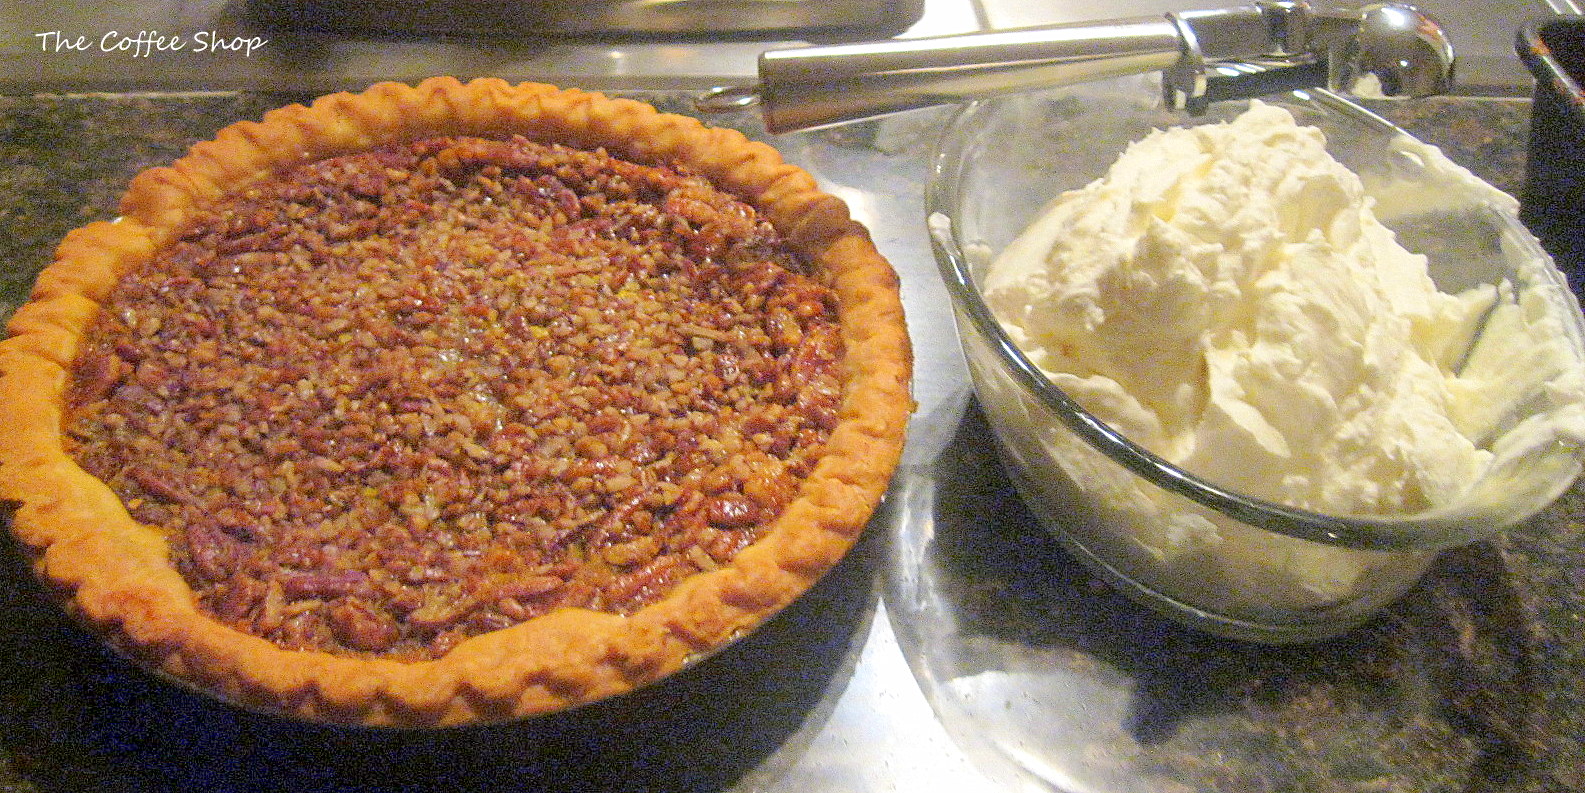
Now... here comes the Recipe to make a delicious and very old-fashioned Pecan Pie! It uses Maple Syrup and Molasses instead of Karo Syrup, to make sure it has the robustness, deep flavor and crisp crust from the original Pecan Pies.

This Pie is Original from the Cook's Country Show/Site... and I thought it would be great to share with all of you!


Pecan Pie, Top it with Homemade Whipped Cream Preferably

Ingredients
  • 1 cup maple syrup
  • 1 cup packed light brown sugar
  • 1/2 cup heavy cream
  • 1 tablespoon molasses (regular or light, not dark)
  • 4 tablespoons unsalted butter, cut into 1/2-inch pieces
  • 1/2 teaspoon Salt
  • 6 large egg yolks, lightly beaten
  • 1 1/2 cups toasted and chopped pecans
  • 1 (9-inch) unbaked pie shell (you can use your favorite pie shell or my own recipe which I shared in the Pumpkin Pie Recipe I posted a few days ago), chilled in pie plate for 30 minutes
Instructions
  • 1. Make Filling: Adjust oven rack to lowest position and heat oven to 450 degrees. Heat sugar, syrup, cream, and molasses in saucepan over medium heat, stirring occasionally, until sugar dissolves, about 3 minutes. Remove from heat and let cool 5 minutes. Whisk butter and salt into syrup mixture until combined. Whisk in egg yolks until incorporated.
  • 2. Bake Pie: Scatter pecans in pie shell. Carefully pour filling over. Place pie in hot oven and immediately reduce oven temperature to 325 degrees. Bake until filling is set and center jiggles slightly when pie is gently shaken, 45 to 60 minutes. Cool pie on rack for 1 hour, then refrigerate until set, about 3 hours and up to 1 day. The wait is totally worth it! Bring to room temperature before serving.
 Enjoy!

© Paloma K.

Monday, November 5, 2012

Traditional Pumpkin Pie!

Hello everybody! How was your weekend? How are you feeling today? I hope that "exercising gratefulness" in November sticks with all of us and we turn it into a lifestyle! Thanksgiving should be part of our daily life!

So... I hope you are enjoying my Thanksgiving series (go back a couple of posts and you'll be able to see what I am talking about) ... Well... I've been sharing my Thanksgiving Menu with all of you... and the next item would be Lime Jell-o and then even Dinner Rolls... but I thought... I would postpone that for a little later and instead I am going to share with you a "Traditional Pumpkin Pie" recipe because we don't need to wait for Thanksgiving to enjoy it... am I right?

(I am using Libby's recipe for the filling)

Ready?
Traditional Pumpkin Pie with Homemade Crust
 
Traditional Pumpkin Pie

First of all, let's make the crust! (skip all this if you are going to buy a "ready to bake" pie shell from the store)

(I use this recipe every time! You can use this for apple, cherry or your favorite pies too! just double it so you have enough for the bottom and top if necessary)

Mix in a large bowl:
1 cup all-purpose flour
1/2 teaspoon salt
1 1/2 tsp. sugar

Then cut in using the dough blender (or a fork):
3 tbsp. softened butter
3 tbsp. shortening
3 - 4 tbsp. ice water (just enough water to make the dough come together, once it forms a ball, stop adding water)

Chill the Pie Dough

Wrap your pie crust in plastic wrap. Then place in refrigerator for 20 or more minutes, while you make the pie filling.  

Let's make the filling!

  • 3/4 cup granulated sugar
  • 1 teaspoon ground cinnamon
  • 1/2 teaspoon salt
  • 1/2 teaspoon ground ginger
  • 1/4 teaspoon ground cloves
  • 2 large eggs
  • 1 can (15 oz.) Libby's 100% Pure Pumpkin
  • 1 can (12 fl. oz.) Evaporated Milk
  • Whipped cream  for garnish (optional).

Directions

MIX sugar, cinnamon, salt, ginger and cloves in a small bowl. Separately Beat eggs in a large bowl, stir in pumpkin puree and sugar-spice mixture. Gradually stir in evaporated milk until just incorporated. Set aside.

Rolling Pie Crust

Roll the dough until it is around 1/8th of an inch thick. Once you have rolled out the dough, wrap it around the rolling pin and unroll it onto your pie pan, shape it to fit the inside of the pan (and shape the borders with your fingers to make it look "wavy" like a traditional pie)


Now POUR filling into pie shell.

BAKE in preheated 425° F oven for 15 minutes. Reduce temperature to 350° F; bake for 40 to 50 minutes or until knife inserted near center comes out clean. Cool on wire rack for 2 hours. Serve immediately or refrigerate. Top with whipped cream before serving (homemade whipped cream is SOOOO good and easy to make! I'll share my recipe tomorrow, but again, don't stress about it... if you want to just buy the whipped cream already made, then it's your choice!).

Note: You can also buy a "ready to bake" pie shell from the frozen section in the store... but homemade of course it's better... although trust me... what matters most is that you don't fret about it... and if you want to save time and energy just buy the shell! I won't tell anybody!

© Paloma K.

Saturday, November 3, 2012

That was so much fun!

I just want to thank everybody who stopped by for my SITS day and made it extra special with encouraging comments!  I am still trying to catch up with all of you! So be patient if I haven't replied to you... I'll get to it!

Many thanks again!

Now... I just want to share a picture of my girls and my hubby... We went to a pumpkin patch and they had one of this "face in the hole" thingies for pictures... hubby got behind the "indian" structure... to have his picture taken but the girls decided to turn it into a kissing booth!


They sooo melt my heart! Today... is the 3 day of November... and I am thankful for... Family love!

What are you thankful for?


© Paloma K.

Thursday, November 1, 2012

Thanksgiving Menu - Cranberry/Orange Relish

Hello dear friends, sorry I've just been posting and not commenting much, the life of a wife, mom (cook and baker go here too) and blogger sometimes can be hectic! You  know I love being here and I love commenting/replying! I am trying! really! I hope you still mentioned coffee somehow on any of your posts of the week to be able to link back and link up to our party on Friday! It's going to be a big party! You'll see! We'll be having a "double celebration" and you know that at least I try to always tweet the posts that link up with us!... So... keep coming back! I'll always try to have something special for you!

Today I thought I would continue with my Thanksgiving Menu that I've been sharing with you... The next item on My Menu would be mashed potatoes and gravy... I don't think I need to tell you how to make classic mashed potatoes... all I can say is that.... ehem... well... I don't make my gravy from scratch! Remember I am talking about a 'stress-free Thanksgiving Dinner' where the host/hostess can enjoy as well! so ... if you feel there's something you'd rather just buy already made, go ahead and buy it!' I do prefer things from scratch.... all I am saying is that if there is something, anything, that would cause you to stress out... don't do that... like Beth Moore would say: "Do what blesses, not what burdens"!

So... the next item on my menu is a delicious, really delicious Cranberry/Orange Relish... we prefer that to the cranberry jelly ... but it's your choice! I hope you do try it! It's really yummy and super easy to make! I got this recipe from Auntie Sally (Hubby's aunt) and I am happy to share it with you (just her sugar cookies recipes I am not allowed to disclose )

From left to right: Auntie Janet, Grandma Shirley, Auntie Amy, Auntie Sally.

*Auntie Sally's Cranberry - Orange relish*
 
I don't even know why I've never actually taken a good picture of this deliciousness! But this relish is the one in the center there!

Yummy stuff!
 
Ingredients: 
(Yield: about 3 1/2 cups, plenty for many!)
4 cups fresh cranberries
1 orange (peel and pulp)
2 cups of sugar

Directions:
Finely chop 4 cups cranberries and 1 orange (peel and pulp) in food chopper or processor.  
Stir in 2 cups sugar.  Cover; refrigerate at least 3 hours (overnight is better).


Enjoy!


© Paloma K.

Monday, October 29, 2012

Why you want to Carve the Turkey ahead of time and How to Do it!

 Hi Everybody! It's Monday! it's a cold day here in Texas which I am really enjoying because for most part of the year we get thick/humid/hot climate! I am happy the sky is blue, sunny and the breeze is cold! It's wonderful!

So... Going through my Thanksgiving Menu I already shared with you the recipes for the easy, stress-free appetizers:

Deviled Eggs and Stuffed Celery

I don't need to share to you the "recipe" for a "veggie tray" and dip, right? Again! Thinking of being "practical, efficient and stress-free" I suggest you just do your veggie chopping the previous day (unless you're buying the tray already prepared) and have all the vegetables individually refrigerated in ziploc bags.

Now... Going to our "Entree" section in our Menu... Let's begin with the Turkey... I already gave you a chart to know the "time to bake" per pound (both stuffed and unstuffed) here

Now it's time for me to just make some quick suggestions... First of all, if you use an oven bag (which I highly recommend) just know that the skin of the turkey won't be crispy but it can still have some color to it! How? When you prepare your turkey (with whatever seasonings you use) make sure you add paprika to the mix, and it will give you a beautiful, dark golden color. Especially if you want the big, whole turkey on your Thanksgiving Table for beautiful pictures. BUT here is where my biggest suggestion comes:


Carve the turkey ahead of time! Especially if this is your first time Hosting and/or you want to take some stress off of your Thanksgiving Dinner!

1. Let the turkey rest for at least 30 minutes right after taking it out of the oven before doing any kind of cut to it. If you get a knife in it, all the juices will just drain out of the turkey and the meat will not be as moist.

2. Once it's rested, Carve your turkey ahead of time and separate dark from white meat! I know you want to take pictures of your beautiful turkey at the Thanksgiving Table, but it might not be too practical to let your guests grab a piece for themselves or if you want to carve it in front of everybody at the table you'll just add stress to the process, you'll worry about the tablecloth even! you will have the pressure of everybody watching your every move when carving, and it might not even be as safe! It's better if you have a nice, empty surface in your kitchen, where you can feel free to move! and it won't be as messy! Plus you get the chances of getting better use of ALL THE MEAT in that turkey!

What you will need to carve that turkey:

1. A great carving knife! You can use a sharp boning knife or get a good electric knife which will be very useful! like this one

2. A carving fork like this one

3. A good, big enough, cutting board.

4. Confidence! (Don't be afraid of that bird! You can do it! and again, it doesn't have to be "perfect") especially because, you're not doing it in front of everybody!

So here are the steps to carve a turkey:

How to carve a turkey: step by step! (you can practice with a roasted chicken ahead of time)

Note: -it seems like a lot but I've just gone into big detail to make it very clear- it's actually an easy task! trust me, all you basically have to do is remove the legs, remove the meat from them and keep warm, remove the breast halves from the rib cage, bias cut all the meat into serving size portions and you're done. Here are the steps though:

  • Place the turkey on the cutting board or a platter, breast side up, with the legs facing away from you. Steady it with the carving fork in your guide hand.
  • Cut through the skin that connects one of the legs to the carcass, cutting as close to the leg as possible. (do this for both legs) - Remove the skin from the turkey if desired, that's what I do, especially when using an oven bag to bake it -
  • Set down the knife and pull the leg to make some space from the bird until the ball joint that connects it to the carcass pops (Use a towel to protect your hands if the turkey is too hot.) Once the joint is exposed use a boning knife to cut right through it and easily remove the leg. (do this for both legs)
  • Lay the leg on the board, with the knee facing you, and feel for the joint connecting the drumstick bone and the thigh bone. Once you feel the joint just Place the knife blade directly on it and cut straight through to the board. (There shouldn't be much or any resistance. If you there is, the blade is on the bone, not the joint. Feel for the joint again and adjust the position of the blade accordingly.) (do this for both legs)
  • With your guide hand (left, if you are right handed), hold a drumstick vertically by the end of the bone (the ankle) and let it the other side firmly rest on the cutting board. Then use your knife to cut from the the side you're holding, right to the bottom to remove the meat (do this all around the bone, as close to the bone as possible) -do this with both drumsticks-
  • Once you have big pieces of meat you've removed from the drumsticks, slice them into serving-size pieces (horizontally)
  • Now Lay a thigh on the cutting board, (if you left the skin on, the thigh should be with skin side down) and steady it with the carving fork in your guide hand. Cut along both sides of the bone, from one end to the other (do this with both thighs)
  • Rotate the thigh and just slide your knife between the bone and the rest of the meat, pulling the bone out and removing it completely. -same thing with the other thigh-
  • Now that you have removed all the meat from the thigh, bias-cut it into serving-size slices.
  •  Grip a wing with your guide hand and pull it away from the carcass, just enogh so you can see where it is attached.
  •  Direct the tip of the knife until you feel right between the ball joint of the wing and the socket.
  • Place all that dark meat in a crock pot in low or inside a warm oven covered with aluminum foil to keep warm. You can also use a big skillet with a tight lid in very low heat and gently stir occasionally. - add a tiny little bit -almost nothing- of liquid if necessary-
  • Cut all the way through the joint, through any meat and/or skin, and remove the wing from the carcass.
  • Rotate the turkey so that the other wing is facing your guide hand. Repeat previous steps to remove it. 
  • Now you just have the breast! Steady the side of the breast you’re not carving with the carving fork in your guide hand.
  •  Make a long, thin cut along the breastbone, in the center top of the breast.
  •  Using the tip of the knife, cut down right along one side of the rib cage, then lay down the carving fork and use your guide hand to push or pull the breast half gently away from the ribs as you cut.
  •  Let the knife blade ride the rib cage straight down to the socket where the wing was attached. Cut until the breast half is completely removed. -Do the same thing for the other breast half. Use your carving fork on the rib cage/breastbone to steady the other half-
  •  Lay the breast halves on the cutting board, skin side up (or what would've had the skin side up), and bias-cut it into serving-size slices.
  •  Place white separate crock pot/pan in the oven and/or skillet to keep warm until it's time to serve.
Make sure you plan ahead of time, use the baking/time chart here to know what time you want the turkey in the oven, if your Thanksgiving Dinner for example will be at 4 p.m. and you have a 20 pound unstuffed bird, you want to place the turkey in the oven at 8:30 or 9 a.m. -the latest- This will give you 5 1/2 hours (2:30 to 3:00 p.m.) to bake the Turkey, plus 30 minutes to let it rest, plus time to carve and keep warm. If you are using an Oven Bag, with the same scenario (Unstuffed 20 pound bird) then you can get it in the oven at 11 or 11:30 a.m. at a temperature of 350F, to bake for about 3 1/2 hours, give it time to rest, carve, keep warm.

If you have a "buffet style kind of dinner" you can have the guests serve their choice of dark/white meat directly from the crock pots, your line will go very fast because everything is "ready and cut" for them. If you're keeping the meat warm in the oven, just get it out and let themselves serve from the pans (warn them it's all hot!) Or, if you want to set it all at your Thanksgiving Table, transfer the meat (separate white and dark) to warm dishes with a lid that you can display in the center of your table.

My mom and sister

Nobody will have to mess up with cutting, you'll avoid the stress of "carving in the middle of a table with all the guests around you" and everybody will focus on enjoying! Plus, you won't deal with bones at the table and you'll get better use of all the meat!

Easy, breezy! Happy with her Thanksgiving Plate!

If you have a helpful husband like I do, make sure to keep him around! (LOL!) or make a deal with him "previous" to the event, so you don't have to be "telling him what to do" ... My husband helped me keep my trash can empty, clean surfaces after me, get rid of bones, and keep paper towel handy and ready for me to use!

I hope you'll host! I really do! And I hope that if you've been hosting Thanksgiving for years but it's always been stressful and something you just dread and want to get over with, my tips will help you enjoy it this time!


© Paloma K.

Wednesday, October 24, 2012

Going through my Thanksgiving Menu - Stuffed Celery Recipe!

Hi friends! I am sorry I haven't been posting everyday! If you've been here for the past few days/weeks you know I've been working on a "Thanksgiving series" sharing tips, my menu and I've gone through recipes too for items that would go great on any Thanksgiving table, Today I will put them all together (in the form of links) and I will also add some amazing recipes (from the past) that I've previously shared (and that you can also find in my Recipe Index)


As you can see I've been working hard, trying to share with you my tips and recipes to make this Thanksgiving a Stress-Free one! Hoping you can just quickly find here recipes that will be successful and that will help you, as a host/hostess enjoy such a beautiful American Tradition!

Just like the "if mom isn't happy, nobody is" is true, let me tell you that if the host/hostess isn't happy, the guests won't enjoy as much either! So if your plan is to have a "Perfect Thanksgiving Dinner" start by relaxing, focusing on your blessings and creating an environment/atmosphere that you will enjoy too! If "anything" goes wrong! Don't stress about it! it's not the end of the world, it might actually become a funny memory if you stay calm! Plus, fretting won't really help at all!

Now... the second recipe in my "Thanksgiving Menu" in the Appetizers Section is "Stuffed Celery" this is another "Stress-free" recipe from my "Auntie Amy" ...  you can even have others help you make these! Do you have kids? Let them have fun with it! (they might even be tempted to eat their celery if they were involved in the process of making them) Or if you have family over staying with you, let them do it! It's near to impossible to get these wrong! and you'll have appetizers ready in no time! so that's the recipe I will now share with you:

Stuffed Celery


Ingredients:

1 Bunch of celery (about 4-5 stalks), trimmed, peeled (always peel your celery to remove the overly-fibrous parts) and cut into 3-4 " long pieces.
8 oz. cream cheese
4 oz. drained red pimientos (from a jar) - chopped
garlic powder to taste
1 tsp. horseradish
1 tsp. worcestershire sauce
1/3 cup of mayo
salt and pepper to taste (optional)

Blend all the ingredients together (except for the celery, of course) season with salt and pepper to taste if desired, stuff your celery, plate and Enjoy!

Super easy, isn't it? I hope you will enjoy it as much as my guests and I do!

Don't forget our Coffee Friday! We'll have a great Featured Blogger!

 © Paloma K.

Thursday, October 18, 2012

ThuRsday - Reminder, gReatfulness and Recipe!

Hello everybody! As I mentioned I've been pretty busy, there are some things I just need to nip in the bud here, so hang in there with me as I find the time to "juggle it all" and make time for my blogging! But here I am... trying to keep you updated and bring you something special each time!

So... I wanted to remind you of tomorrow's Coffee Friday! It's going to be gooooood! We do have a special featured blogger that's prepared a delicious treat for all of us! She is creative and ... well... I don't want to give it all away... but you won't want to miss it! I hope I see my "regulars" here and then some new faces too linking-up to our Party!

Also, I wanted to share with you a little quote I found that Oprah Winfrey said; although, if you know me you know I am not an "Oprah" fan... actually I don't even think I've ever watched any of her shows... but anyway... I thought this quote was a great one:

"Be thankful for what you have and you will end up having more. But if you concentrate on what you don't have, you'll never, ever have enough." - Oprah Winfrey

So true! I am just trying to get us in the mood for Thanksgiving and just keep that in mind when that day arrives, Thankfulness is an "on-going" attitude, something that can't just bloom if we never planted and watered it! It's something we must feed every day so it can finally display and reveal itself in the form of fruits that bless those around us! -woah! I guess I was more inspired than I thought-

And now... in the same Thanksgiving spirit... and going through my Thanksgiving Menu I will start to share those recipes with you so you can add to your own menu or just try them whenever you feel like it... Let's start from the beginning, shall we?

Deviled Eggs!

Yes... deviled eggs, are a tradition on hubby's Family Thanksgiving Dinner! Auntie Amy (hubby's auntie) lived in Texas for a long while, so there's always some "Southern Flair" in her kitchen, and Thanksgiving is no exception! so she incorporated "Deviled Eggs" to the Menu and so did I to continue with hubby's family tradition:

I've never really taken a good picture of them because as soon as they're out... they just disappear!


Auntie Amy's Deviled Eggs

9 hard boiled eggs
1/2 cup sharp cheddar cheese
1/4 cup mayo
1/4 cup salsa (Auntie Amy and I use Newman's Own All Natural Chunky Salsa)
2 tbsp. finely chopped green onions
2 tbsp. sour cream
salt and black pepper to taste
Cayenne Pepper (to taste)

Directions: Remove the yellow of the hard boiled eggs, mash it and mix it with the rest of the ingredients (except for the cayenne pepper), fill the whites of the eggs with the mixture and sprinkle with cayenne pepper if desired.

Now... I am sure all of you know how to make "hard boiled eggs" but just in case, I am going to share with you my method to make them AND most importantly to avoid the "grayish" look around the yellow of the egg, it just doesn't look pretty when it's not a perfect bright yellow and there's this gray/greenish look around it... so... here it is:

Place the eggs in a  medium sauce pan with enough cold water to cover them perfectly (or a bigger pan if you have too many eggs), turn on the heat to medium, as soon as the water reaches the roll-boil point set the timer to 5 minutes, after those 5 minutes immediately remove your eggs and place them in icy cold water. Remove the shell right after they're cold enough to handle. (crack on both ends and then roll them with your hand open over a hard smooth surface putting some pressure to completely "crush" the shell, now you can easily remove the shell without "damaging" the egg). Enjoy!

Buy beautiful deviled egg platter in Amazon
 © Paloma K.

Disclaimer: This link contains affiliate links

Thursday, October 11, 2012

Thanksgiving Made Simple - Part II

Hello everybody! First of all let me tell you that I've been really busy, just with great stuff, with my girls, friends, Bible Study, etc... Yesterday we even went to a Pumpkin Patch/Farm ... it's Texas so it's more like a "Texan Ranch" ... I miss Wisconsin all the time but fall... well... fall makes me even more nostalgic! Yesterday we reached 90 degrees outside with over 90% humidity! So you can imagine it didn't have a "Fall" feel! but we still had lots of fun!


 So, that was that... Now... I want to remind you of our Coffee Friday Party tomorrow! We are in for a treat! Our featured blogger has prepared a great post and just a delicious cup of coffee to share with us! Make sure you mention coffee somewhere in your posts this week and also, remember to make sure your post links back to us, just add a link to "The Coffee Shop" or if you want to you can add the Coffee Friday Party Button that appears on my right sidebar! just grab the html code and paste it in your post.

Now... I will continue to share my "Thanksgiving Ideas and Tips" for an enjoyable Thanksgiving Dinner! You can host it! Trust me! It's all good! The host/hostess deserves to enjoy Thanksgiving too and not just be "Thankful" when "everything is over! If you missed the First Posts of this series click here and if you want to see my Thanksgiving "Menu Idea" click here

Grandma' Huebschen ... A "Thanksgiving Expert" ... Such a beautiful Lady!


 6. Be Thankful! - Ok... I know that was my first point in the previous "Thanksgiving Post" but I feel I can never say this enough (even for myself)! Focus on what you're thankful for and have the right attitude about it! Instead of worrying about the dishes to wash, thank God for having food that allows you to have those dirty dishes, Thank Him for the running water in your sink! Don't take it for granted! Thank God for the kitchen you have where you can prepare a meal instead of focusing on the "counters you'd love to replace" or stress over the "appliances you'd love to have" ... I find it very interesting that the more people have the more stressed and even depressed they seem to be... we're not "entitled" to all these blessings! God is Good... and yes, bad things happen, I don't know the exact situation and circumstances you're going through... but don't blame Him for the bad... we live in a corrupted world! He is not the source of evil, death and disease, but He is good and even in a bad world, we can enjoy all kinds of Blessings because of Him! ... when we go through something like a "party or holiday" it's weird that instead of enjoying it, it seems to cause us "pain"... just have fun with it! do your best.. and like Beth Moore would say (I got this from her Bible Study "on James") "Do only what Blesses and not what Burdens" ... so true! Don't try to live up to Martha Stewart's standards... just try to enjoy your family, enjoy food, enjoy the fellowship and His goodness.

7. Make Room! - Start getting things organized in your fridge/freezer ahead of time... I don't know about you but I have a crazy, weird refrigerator! LOL! ... I live in an apartment so I don't have an extra freezer or anything to store! So... I know I'll have to keep my fridge pretty empty and organized so I can have room to store leftovers and also for the things I am making ahead of time that will need to be refrigerated (pies, sauces, etc.) ... If that's your case, make sure you don't go "grocery shopping" right before Thanksgiving and then you find out you don't have room to store prepared meals, etc.

8. Don't reinvent the wheel - I'd recommend you to not try new recipes for your Dinner! ... If you have the time and there's a really great recipe you'd love to try (like the ones you can always find here at "The Coffee Shop") then I'd suggest you to try making them ahead of time to make sure they are what you expect and so you can check how long it takes *you* to make it. That way if it doesn't really 'work' for you then it isn't that big of a loss.

9. Only what you enjoy - If you don't like sweet potatoes (like me) or Pumpkin Pie even! Don't include them! Do only what you know everyone will enjoy and don't stress about it! I know they are like "must haves" but ... they really aren't... Maybe with the "time you save" from not making it you can focus on perfecting those dishes you know everyone loves!

10. Wear comfortable Shoes! - LOL! If you have never hosted Thanksgiving or if you've never enjoyed it before and you've decided to do it for the first time or to finally enjoy it too... Then ... Make sure you're wearing comfortable shoes! I know you want to look good but make sure you're comfortable... throw those high heels in the closet, at least while you're prepping and cooking it all... You can put them on when you join everybody too eat, etc.

11. Go to bed early the night before - When I know something is going to happen here at home (holiday/party/people over, etc.) I try to enjoy a relaxing time the night before and get a good night of sleep to be refreshed in the morning. I enjoy a piece of dessert, watch a funny (nothing stressful) movie or show and then just go to bed.

12. Let people help you! - I have very little ones... But if you have older kids, let them help you! I must
admit I am a very controlling person and I feel like "if I don't do it, it won't be right" but ... if your older kids and/or friends want to help, be specific and tell them what they can do! Prepare ahead of time a list of things that others could do! that are easy but time consuming.  On my first thanksgiving I had my SIL peel the hard eggs for the deviled eggs and my sister I think I had her watch my girls! I can't do it all! And I don't have to! I am sure I am not the only one!


There are many more tips coming... some great ones... trust me! But I have to stop for now... so you can actually (and hopefully) read it!

I hope you're taking note on these very simple things that will make sure YOU, THE HOST/HOSTESS, will enjoy a wonderful Thanksgiving as well!

 © Paloma K.