Printfriendly

Print Friendly and PDF

Wednesday, February 20, 2013

Red Velvet Cake with Mascarpone Cream Cheese Frosting

Hello everybody! As you have probably noticed I haven't been blogging as I used to and even the "Coffee Friday" tradition has been stopped, I am taking care of business in my home, baking tons and just enjoying my girls and my new roles in church as a translator and other things that I am honored to be involved with... So right now my blog is suffering and even when I miss it I am ok with it because I know life is like that and I am busy living it! So much blessings to enjoy!

A tradition that will remain is my CAKE OF THE MONTH... I am part of The Cake Slice Bakers and we choose one cake each month and then reveal our cake on the 20th in our blogs! For February we chose "Red Velvet Cake with Mascarpone Cream Cheese Frosting" and according to my husband it was a great choice!

The original recipe makes a two layered 9" round cake but I decided to go for cupcakes instead and made them for Valentine's Day, cupcakes are not only "cute" but also easy to share with friends or in this case with people at hubby's work.

Here are my cupcakes:


 I didn't take many pictures of the process or even an individual cupcake, it's been a few rough weeks here in our house and I guess I wasn't very inspired... but at least I took a picture of a cupcake before hubby finished it...


I guess what doesn't help is the fact that I can't really eat cake, so I only enjoyed a small bite of one... they were good but hubby actually said they were awesome! So... I highly recommend these... here is the recipe:

Red Velvet Cake with Mascarpone Cream Cheese Frosting
Makes one 9" double layered round cake or 24 standard cupcakes
Slightly adapted from: Vintage Cakes by Julie Richardson

Ingredients: (All ingredients should be at room temperature unless it's indicated otherwise)

For the cake
  • 2 1/2 cups sifted cake flour (important to sift before measuring)
  • 1/2 cup lightly packed unsweetened Dutch Processed Cocoa
  • 2 tsp. baking powder
  • 1 tsp. salt
  • 3/4 cup safflower oil
  • 2 tsp. vanilla extract
  • 1/2 tbsp. red gel color
  • 3/4 cup unsalted butter
  • 1 3/4 cup sugar
  • 4 eggs
  • 2 egg yolks
  • 1 cup buttermilk

For the frosting (this frosting recipe makes about 3 cups, enough to fill and top but not completely frost an 8 or 9" layer cake or 24 cupcakes)
  • 8 oz. cream cheese
  • 8 oz. mascarpone cheese (cold)
  • 1/2 cup heavy cream (cold)
  • 1/3 cup sugar
  • 1 tbsp. pure vanilla extract
Directions:
  • Center an oven rack and preheat oven at 350F
  • In a small bowl sift together flour, cocoa, baking powder and salt, whisk until well mixed.
  • In another small bowl combine oil, vanilla and food coloring.
  • In the bowl of a stand mixer (using paddle attachment) cream butter and sugar together on med-high speed until fluffy about 5 minutes. Scrape sides of the bowl as necessary.
  • With mixer on low speed drizzle the oil mixture into the batter until well combined.
  • Turn the mixer gradually up to med-high speed and beat until fluffy again. 
  • Blend in the eggs and egg yolks one at a timeadding the next one as soon as the previous one has disappeared into the batter, no longer! It is important to not overmix.
  • With the mixture on low speed, add the flour mixture in three parts, alternating with the buttermilk in two parts, beginning and ending with the flour.
  • After each addition, mix until just barely blended and stop and scrape the bowl. Stop the mixer before the last of the flour has been incorporated and complete the blending by hand with a rubber spatula to ensure you do not overbeat the batter.
  • Divide the batter evenly into the prepared pans (or muffin tins). Rap the pans firmly on the counter to release any  air bubbles.
  • Place the pans in the middle of the oven and bake until the centers of the cake spring back when lightly touched (about 28-30 mins or about 20 minutes if baking cupcakes). Cool n rack for 30 mins. before removing from pans. Be careful when removing from the pans, as they are fragile and they could crack. Leave the parchment paper on until you assemble the cake. 
Make frosting:
  • Using a stand mixer with paddle attachment beat the cream cheese until it's smooth and uniform in texture. Add mascarpone, cream and sugar. 
  • Beat on low speed until combined, scraping the sides of the bowl well to ensure all ingredients are incorporated. 
  • Kick the mixer up to high speed and blend the frosting for about 1 minute or until it looks creamy and thick. Turn down to low speed, add vanilla and mix just until blended.
(This frosting keeps in the fridge for up to 5 days)

Assemble the Cake:
Once the cake has completely cooled off place one of the layers, top side up on a serving plate. Using a metal spatula spread half of the frosting over the top of the cake, spreadint it slightly over the edge of the cake. Place the next layer of the cake, top side up again, on top of the frosted layer. Spread the remainder of the frosting over the top of the cake.

This cake keeps well in an airtight container in the refrigerator for up to 2 days, allow at least 1 hour for the cake to come to room temperature before serving.

Enjoy!

© Paloma K.

Wednesday, January 30, 2013

Delicious Appetizer - Battered Cauliflower

Hello everybody, here I am ... working hard at being a wife, mom, choir member, church member, community member, and every single role I have... I do enjoy my "blogger" role as well! But I've had to make sure all my priorities are in order and there's so much to do that my blogging has taken a toll! I do need to keep it up though because it's my very way of expressing myself, it's a personal outlet... I just LOVE IT and love you all! (or like they say here in the South... "y'all")

Today I want to share with you a delicious, inexpensive and great way to make a delicious appetizer or side dish... in Spanish we call it "Coliflor lampreada" (which I guess the closest translation would be "battered cauliflower") ... My husband is not a big fan of cauliflower but he LOVES, LOVES, LOVES this dish! He eats the cauliflower florets like if they were chips when I make it like this... and last night (he had it for dinner) and even said: "I wish my mom could've tried this" (she passed away before I met him) so I know it's a huge compliment...

So here goes MY battered cauliflower recipe... it's very basic and you can get creative with it... adding some herbs to the batter, etc...

Here's how I make it:


Coliflor Lampreada

Yield: 4 servings

Ingredients:
  • 1/2 cauliflower (steamed or boiled just until fork tender but not falling apart on its own)
  • 2 eggs (divided)
  • 1 1/2 cups of flour
  • 1 tsp. garlic powder
  • 1/2 tsp. black pepper 
  • 2 tsp. salt
  • About 2 cups of vegetable oil (I prefer Nutrioli soybean oil for this)

Directions:
  • When the cauliflower has been cooked and cooled divide it in small florets, season them with some salt and black pepper.
  • Mix flour, garlic powder, 1/2 tsp. black pepper and 2 tsp. salt together, coat the cauliflower florets with the flour mixture, set aside the "floured florets"
  • In a mixer bowl, with the whisk attachment, whisk the egg whites on high speed until stiff peaks form, with the mixer still running on high add the egg yolks one at a time and keep mixing until you have a spongy looking yellow batter. 
  • While the eggs are mixing pour the 2 cups of oil (or more if needed) in a wok or a big saucepan at medium/high heat until it's very, very hot (ready for deep frying)
  • Add the cauliflower to the egg batter making sure the egg is perfectly covering all the cauliflower.
  • With a  spoon carefully place the battered cauliflower florets in the oil (don't throw them or hot oil will splash) and just turn it to make sure all sides have a nicely golden color (you can do 4 or 5 florets at a time, don't do them all at once so you can handle them properly and make sure they all are evenly fried)
  • Place the florets on paper towel to remove the excess of oil. Serve immediately.

Enjoy!!!

© Paloma K.

Sunday, January 20, 2013

The Cake Slice and The Classic Cake

Hello everybody! Sorry I haven't been around as much... I am doing good stuff though! Being a mom and enjoying the terrible two's -OY!- but it's all a blessing, even those little things that now frustrate me... I know it's just a stage and this too shall pass and I might soon look back and feel like it passed way too quickly!

So... as many of you know I belong to a Secret Online Baking Group called The Cake Slice, we are a group of ladies who love baking and we choose a different book each year to bake from, right now we are baking from "Vintage Cakes" by Julie Richardson and it's been such a joy to bake from this book!

For January, two of the 4 cakes to choose from were tied at the end... so we had the choice to bake either of them... I chose "The Classic" and I am glad I did... I actually talked to a friend (Laurie) about it and about the fact that I can't really eat much cake anyway... and she had the great idea to use it for her hubby's birthday! They're all great friends so we made it a "date" and we all had lunch at her house yesterday with her family to enjoy her food and my cake... her husband really enjoyed it and my husband was almost like he was in heaven... he couldn't stop saying how much he loved it!

I am not sharing the recipe this time... but I am sharing with you "the process" of making it... I hope it's still fun!

My first two layers actually sunk! I was distracted and used baking soda instead of baking powder!
Chocolate ganache in the making! Semisweet chocolate + heavy whipping cream + dark brown sugar = awesomeness!
Second batch of cake layers were great! The recipe asked to make 4 layers out of the two but I used bigger round pans and preferred to have 2 thick layers than 4 thin ones.
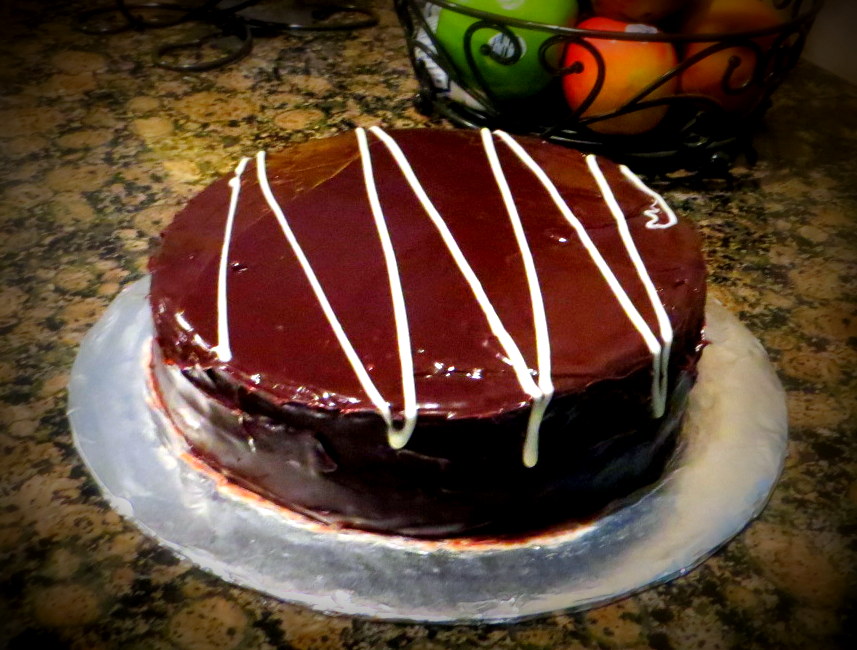
This would've been the final product but I thought it looked too simple and dark....

So I gave it an extra touch with melting some white chocolate with butter and heavy cream to decorate the top.

Here's the birthday boy waiting for his wife to give him a slice!
Now... this is a cake slice! although it was supposed to be "yellow cake" and I found it "whiter than yellow" Delicious though!

Success!

© Paloma K.